








![3D Explainer Video - ScribbleLive.mp4_snapshot_00.12_[2022.03.09_03.14.16]](https://increditors.com/wp-content/uploads/elementor/thumbs/3D-Explainer-Video-ScribbleLive.mp4_snapshot_00.12_2022.03.09_03.14.16-r7wb53mx72rxst3qcqyrfxdmeyzb5r9jbl0wbjujh4.png "3D Explainer Video – ScribbleLive.mp4_snapshot_00.12_[2022.03.09_03.14.16]")



























Editing for 9:16 is a different discipline than horizontal work — safe zones, pacing, typography, and color grading all shift when the canvas rotates. This guide covers every craft layer: framing principles, cut rhythm, caption strategy, platform-by-platform spec differences, and the mix decisions that keep mobile viewers from tapping away. Apply these techniques and your vertical content will hold attention from first frame to final call-to-action.
- Why 9:16 Demands a Different Edit Mindset
- Framing, Safe Zones, and Subject Placement
- Pacing and Cut Rhythm for Short-Form Attention
- Text, Captions, and Motion Graphics in Vertical
- Audio Mixing for Mobile-First Viewing
- Platform-by-Platform Optimization: TikTok, Reels, Shorts, Stories
- Color Grading Strategies for the Vertical Frame
- Workflow and Tooling for Vertical Production
- DIY vs. Hiring a Specialist: When Does It Matter?
- FAQ
- Verdict
Why 9:16 Demands a Different Edit Mindset
Vertical video is not simply a horizontal video turned on its side. The frame proportions alter every single editorial decision — how subjects are composed, where motion lands, how text is placed, how pacing is calibrated. Editors who treat 9:16 as a cropped 16:9 export typically produce content that looks awkward, wastes prime screen territory, and loses mobile audiences within the first few seconds.
The vertical canvas is tall and narrow. That height creates an intimate, face-first visual language that audiences on TikTok, Instagram Reels, YouTube Shorts, and Snapchat have been trained to respond to. Eyes naturally read downward when the canvas is portrait-oriented, which means visual hierarchy, subject positioning, and graphic overlays all need to be purpose-built for that reading path — not retrofitted from a widescreen project.
Mobile viewership is genuinely dominant across short-form platforms. Published platform data consistently shows that a significant majority of content consumption on TikTok and Instagram happens on mobile devices held vertically — meaning content shot and edited natively for 9:16 gets more screen real estate, triggers fewer UI overlays, and avoids the letterboxed dead-zones that pillar-boxed horizontal videos produce. The craft starts with accepting that vertical is the primary format, not a secondary export.
The Three Core Differences From Horizontal Editing
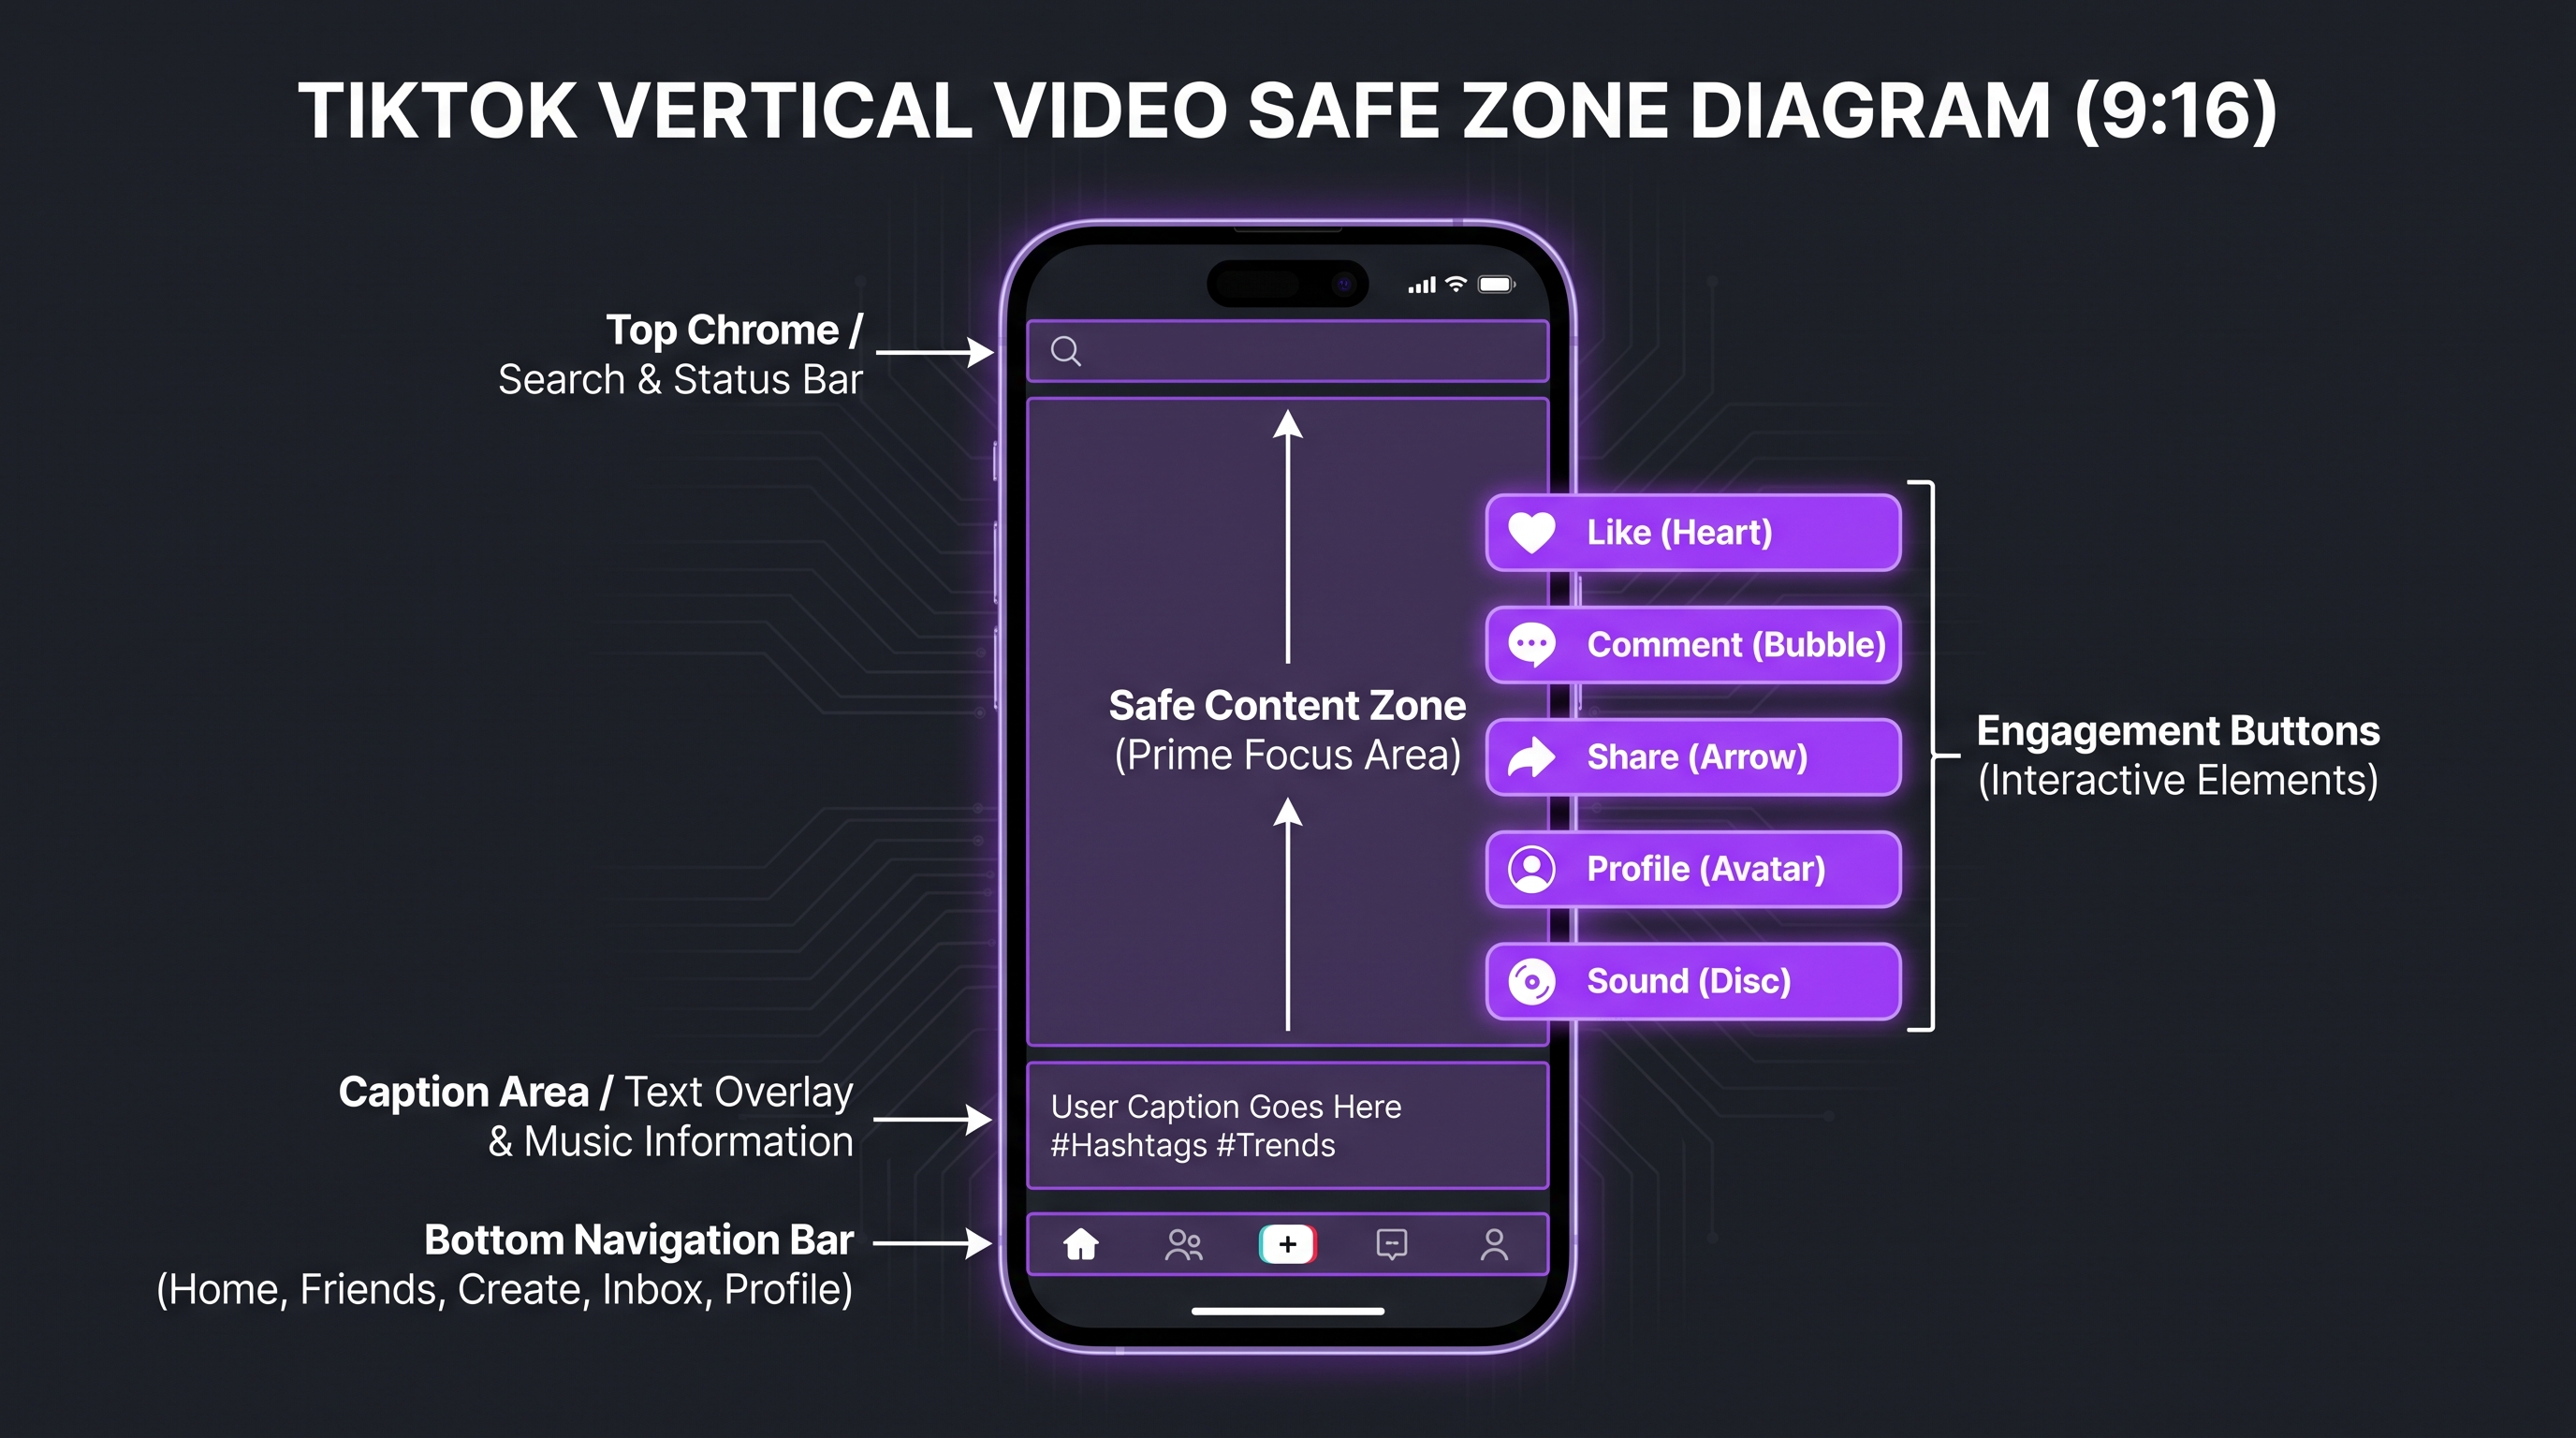
Three fundamental differences separate good vertical editing from a crop-and-export job. First, vertical real estate is vertically distributed — you have far more room above and below your subject than beside them, so visual storytelling moves top-to-bottom rather than left-to-right. Second, attention decay is faster — the infinite-scroll UX of short-form platforms means the first one to three seconds must contain a hook potent enough to interrupt a thumb-swipe. Third, UI chrome overlaps your frame — every platform overlays buttons, usernames, captions, and engagement icons on specific quadrants of your video. An editor who ignores these zones will inadvertently bury crucial information under a like button.
Framing, Safe Zones, and Subject Placement
Every major platform reserves portions of the 9:16 canvas for its own interface elements. Understanding these UI safe zones before you start editing — not after — prevents the frustrating discovery that your product label or speaker’s face sits directly beneath an action button or username overlay.
Platform Safe Zone Reference
The practical guideline: keep all essential visual information — faces, product labels, on-screen text, key action — within a central “safe box” running from roughly 10% from the top down to 70% of the frame height, and staying clear of the rightmost 15%. Many editors mark this zone as a guide overlay in their NLE before editing begins.
Subject Placement Principles
In a talking-head vertical video, the subject’s eyes should sit in the upper third of the safe box — typically around 25–35% from the top of the full frame. This positions the face prominently while leaving room below for captions and above for channel identity elements. When the shot is wider — a product demonstration or on-location setup — the vertical rule of thirds applies: key objects placed on the upper or lower horizontal third line tend to feel more dynamic than dead-centered compositions.
For reframing horizontal footage into 9:16, avoid simple center-crop algorithms. Use position-keyframed pans to follow the action beat by beat, or use AI-assisted smart reframe tools (DaVinci Resolve’s Scene Cut Detector and Smart Reframe, Adobe Premiere’s Auto Reframe, or CapCut’s built-in AI crop). Automated tools produce acceptable results for straightforward talking heads, but complex multi-person scenes or fast-moving action sequences almost always require manual keyframing to hold the story correctly.
💡 Pro Tip: If shooting native vertical, brief your camera operator or director to keep subjects in the upper half of the frame and to resist wide establishing shots — vertical real estate rewards intimate framing. Editing challenges are dramatically reduced when the footage is captured with 9:16 composition in mind from the start.
Pacing and Cut Rhythm for Short-Form Attention
Short-form vertical content lives or dies by its pacing. The infinite-scroll environment means your audience will tap away the moment engagement drops — and unlike a YouTube long-form video, there is no loyalty buffer built up by a channel relationship. Editors must engineer retention beat by beat.
The First Three Seconds Rule
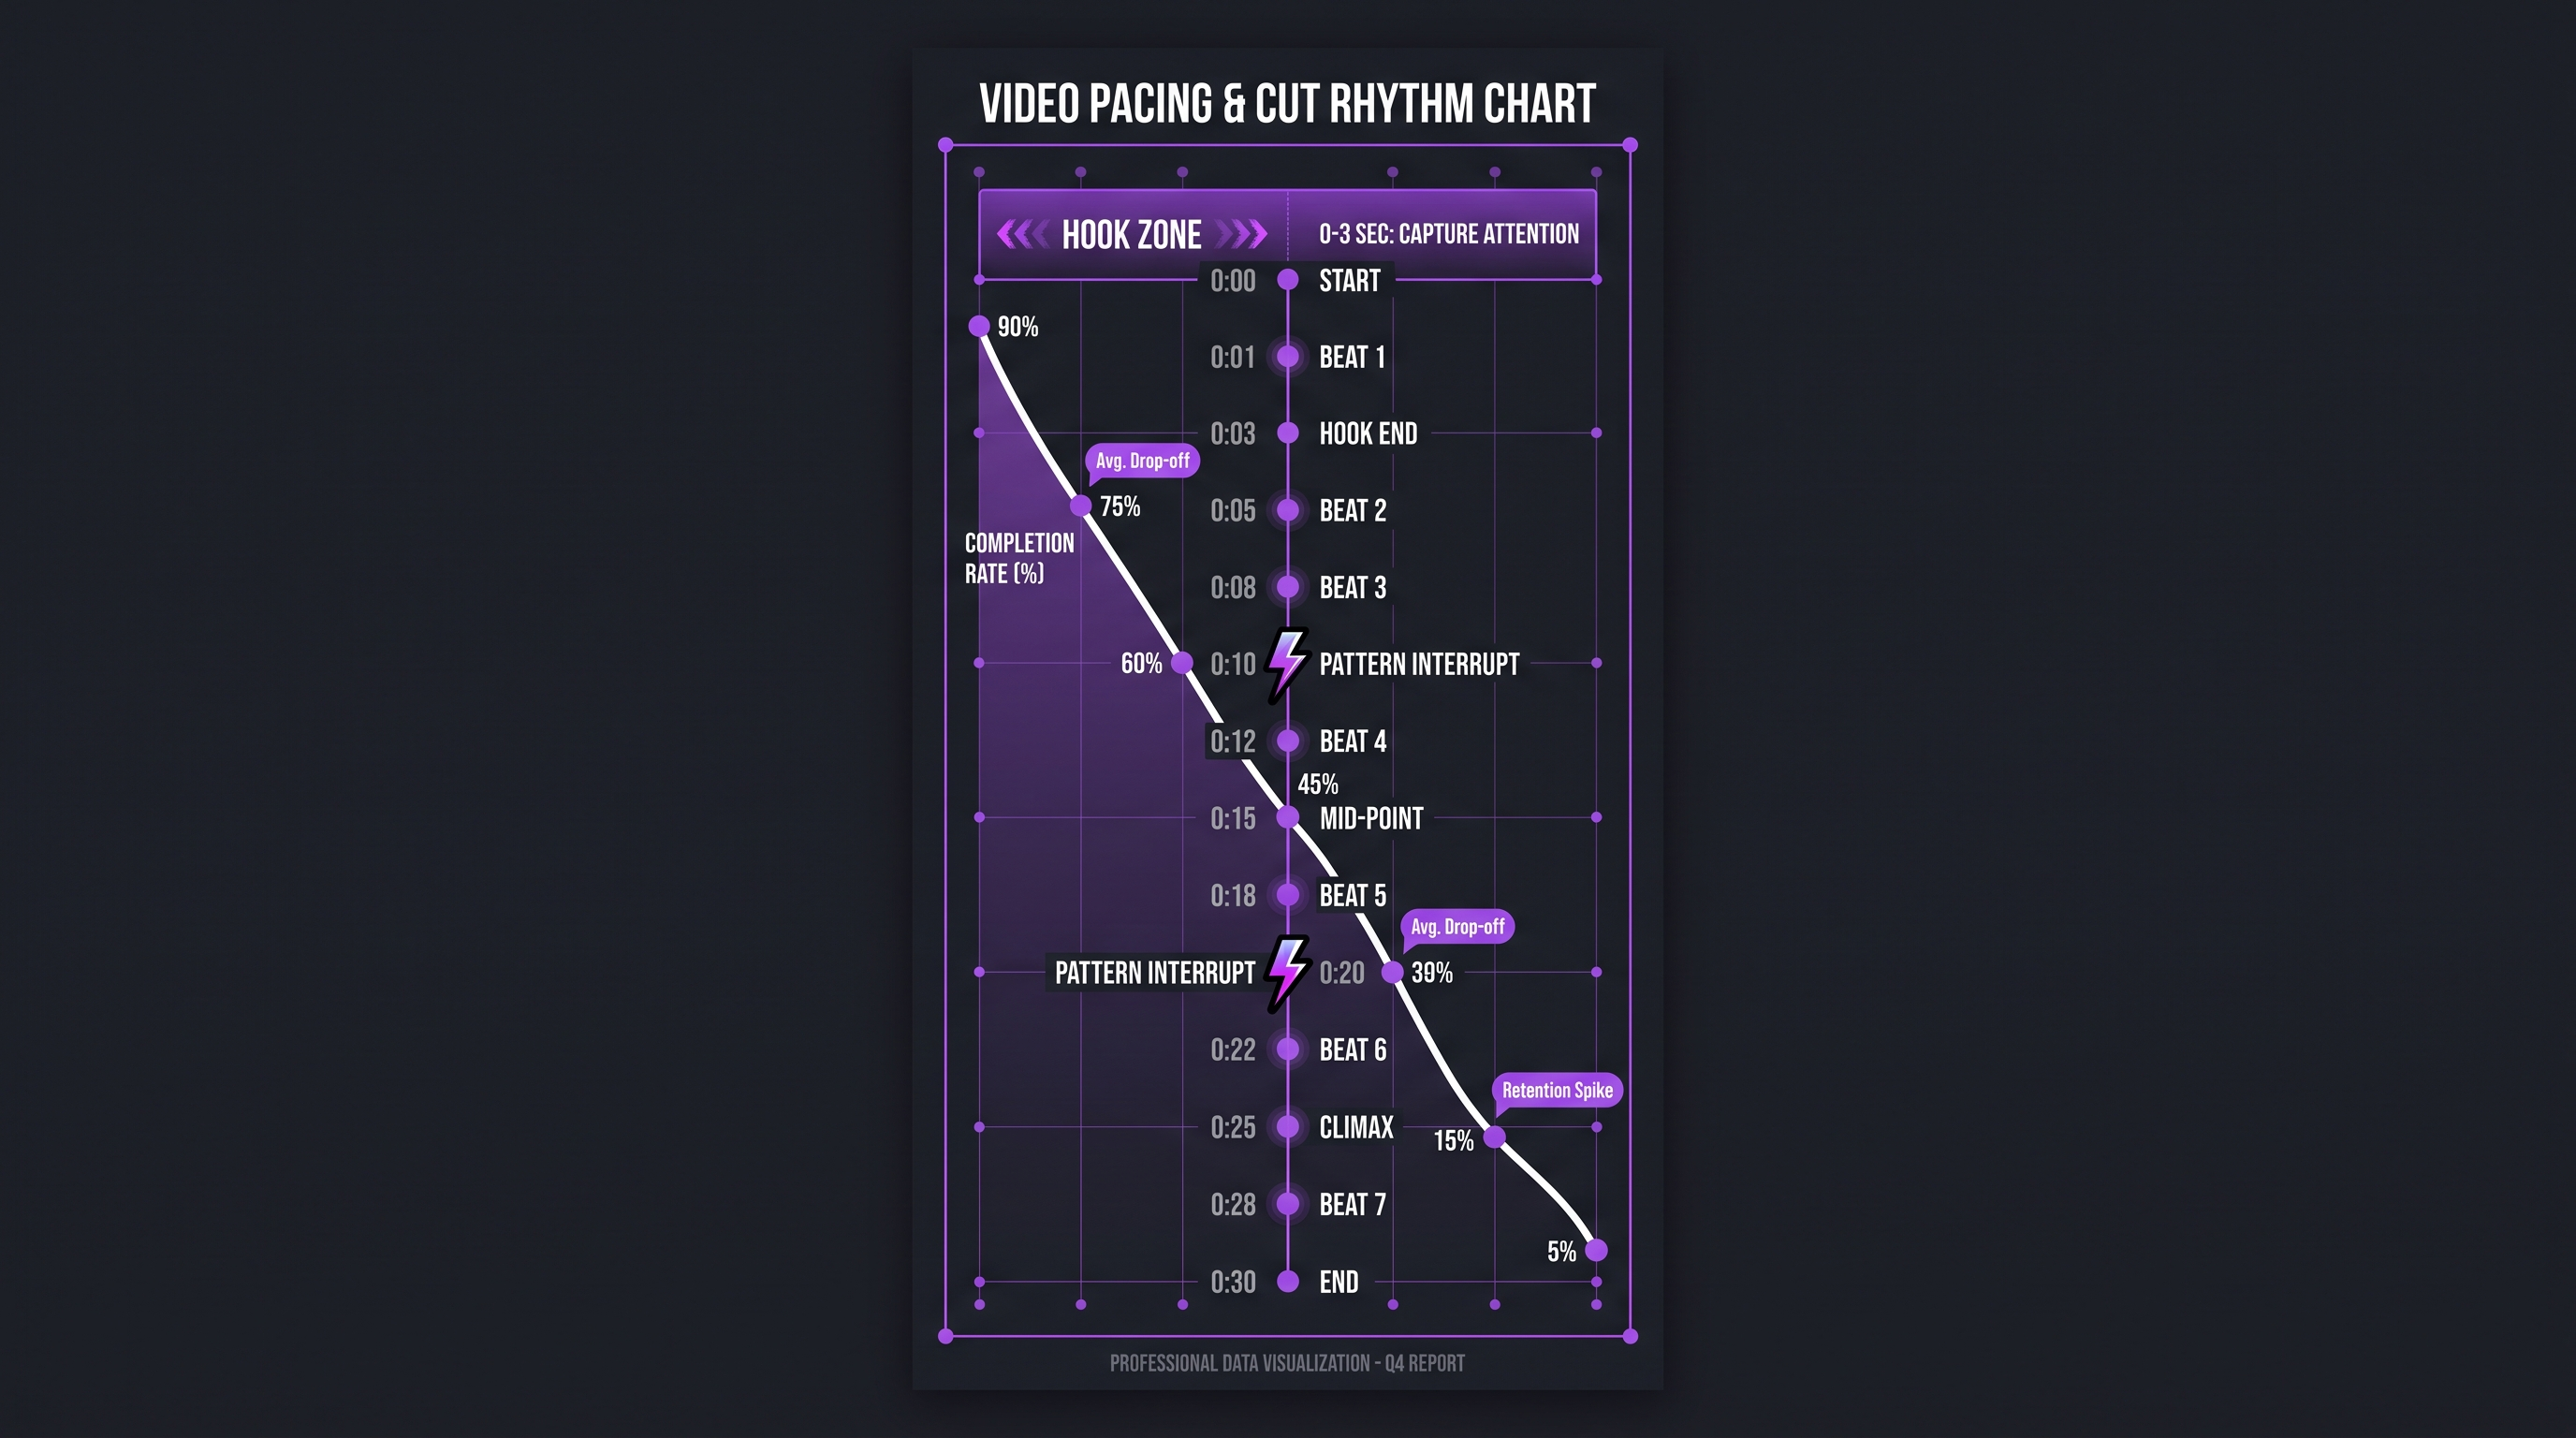
The hook must be in the first frame, not the third second. Platform algorithm data consistently shows that videos retaining viewers past the three-second mark perform significantly better in distribution. That means your opening frame should already contain visual tension: an unresolved question, an unexpected visual, a bold claim, or a moment of action mid-sequence. Fade-ins from black, logos, branded intros, and “hey welcome to my channel” openers are conversion-killers in the vertical format unless they are themselves visually compelling.
A proven approach: start in the middle of something — a reveal, a transformation, a reaction — and let the setup unfold after the viewer is already engaged. Jump cuts and rapid pattern interrupts in the first 1–2 seconds signal energy and momentum, telling the algorithm (and the human) that this video is worth watching.
Cut Rate and Pattern Interrupts
Vertical short-form content typically benefits from faster cuts than equivalent long-form content, but faster does not mean random. Industry benchmarks for well-performing short-form videos suggest average shot durations ranging from about 1.5 seconds to 4 seconds for talking-head content, with more energetic product or lifestyle clips cutting even faster. The key is that every cut should serve a purpose: advancing information, shifting perspective, or resetting attention.
Pattern interrupts — deliberate changes in camera angle, subject distance, color, or audio texture — reset the viewer’s attention clock. Place one every 8–12 seconds in instructional or talking-head content. In music-driven or lifestyle content, align cuts to beats and use visual transitions (wipes, jump cuts, color pops) as the interrupt mechanism. The goal is to make each new section feel like a fresh start without breaking narrative continuity.
Silence and Breath in Vertical Video
Not every moment needs to be fast. Deliberate pauses — a beat before a punchline, a held shot on a reaction, a moment of silence before a product reveal — create emphasis. These breath moments work precisely because the rest of the content is moving quickly. Use them sparingly: one or two planned pauses per 60-second video carry significant weight. More than that and the pacing loses tension.
Text, Captions, and Motion Graphics in Vertical
Text in vertical video is not decoration — it is a primary communication layer. A large portion of short-form content is watched with the sound off (published platform research from Meta and others consistently finds silent viewing rates of 40–70% depending on context). Captions and on-screen text are not optional; they are the audio track for a significant share of your audience.
Caption Design Principles
Captions for vertical video should be positioned in the lower third of the safe zone — typically around 55–70% down the frame. Font size needs to be larger than you think: on a mobile screen, text smaller than 40–48pt (at 1080px frame height) becomes genuinely difficult to read. Bold, sans-serif fonts (Inter, Montserrat, Helvetica Neue) with a subtle drop shadow or semi-transparent background chip ensure legibility across light and dark footage.
Word-by-word animated captions — the style popularized by podcast clips and talking-head creators — drive measurably higher retention on some platforms by giving viewers a visual anchor to follow. Tools like CapCut’s auto-caption, Descript, Opus Clip, and the Premiere Pro Speech to Text workflow all generate reasonable starting-point captions; budget time for accuracy passes because transcription errors erode credibility.
Motion Graphics and Lower-Third Design
Motion graphic elements in vertical video must be designed natively at 1080×1920 — do not scale a horizontal After Effects template. The narrow frame means large-scale typographic statements actually work well: a single bold word taking up the full width of the frame creates high-contrast visual impact. Animated text reveals, kinetic typography, and zoom-in reveals all perform well in vertical because they fill the tall frame with movement.
Avoid horizontal scroll animations (marquees, left-to-right slides) — they feel borrowed from billboard design and create visual tension against the vertical reading axis. Vertical wipes, top-to-bottom reveals, and radial animations align with the natural eye path through a portrait-oriented screen.
💡 Pro Tip: Build a master vertical template in your NLE with safe-zone guides, pre-built caption styles, and brand-color text presets. A well-organized template library cuts per-video setup time by a meaningful margin on high-volume vertical production runs.
Audio Mixing for Mobile-First Viewing
Mobile speakers are small. Mobile earbuds are common. Both listening contexts require a different approach to audio mix than broadcast or cinema work, and vertical content creators who ignore the mix typically see their content underperform against better-mixed competitors even when the visuals are equally strong.
Dialogue and Voiceover Treatment
Speech clarity is the non-negotiable. On small phone speakers, low-mid frequency mud (roughly 200–400Hz) accumulates quickly and reduces intelligibility. A high-pass filter around 80–100Hz removes rumble; a gentle dip at 250–350Hz reduces boxiness. Presence boosts around 2–5kHz improve intelligibility on earbuds and small speakers without making dialogue harsh.
Target dialogue levels around -12 to -10 LUFS integrated for social media contexts — louder than broadcast standards, since social platforms apply less loudness normalization than broadcast. The practical test is playing back through your phone speaker at medium volume: if the dialogue sounds clear, natural, and comfortably loud, the level is right.
Music, SFX, and the Silent-View Problem
Since a significant fraction of viewers watch without sound, background music and sound effects should add energy and emotional texture without carrying the information. Any crucial information conveyed only through audio — a statistic, a product name, a call to action — must also appear on screen. Music beds should sit at -18 to -22 LUFS under dialogue, ducking further during key spoken moments using automation or a sidechain compressor.
Sound design in vertical short-form is an underused differentiator. Crisp, impactful sound effects on cuts — a whoosh, a pop, a hit — add perceived production value and keep audio-on viewers engaged. Libraries like Epidemic Sound, Artlist, and Soundsnap provide short-form-licensed sound design kits purpose-built for this format. Epidemic Sound’s guide on vertical content audio offers practical mix benchmarks for different platform contexts.
Platform-by-Platform Optimization: TikTok, Reels, Shorts, Stories
Each short-form platform has its own algorithmic preferences, audience expectations, and technical specifications. Editing for “vertical video” as a monolithic format produces mediocre results on every platform; editing with platform-specific nuance produces top-of-feed results on the ones you target.
TikTok
TikTok’s algorithm rewards completion rate and replay rate above almost all other signals. Editing for TikTok means engineering a satisfying loop: the last frame should feel connected to the first, encouraging the auto-replay behavior that boosts completion. Content length that performs well varies widely by category — tutorials can run 2–3 minutes, entertainment content tends to peak around 15–30 seconds, and trend-based clips benefit from staying under 10 seconds. TikTok’s official recommendation framework explains how the platform weighs engagement signals.
Technical spec for TikTok: 1080×1920, H.264 or H.265, 30fps or 60fps, max file size 287MB for longer content, stereo audio at 44.1kHz. Upload a slightly higher bitrate file than you think necessary — TikTok’s compression is aggressive, and extra bitrate headroom preserves detail, especially in dark scenes.
Instagram Reels
Reels pushes up to 90 seconds and rewards content with strong share-to-Save ratios — meaning educational, instructional, and reference content performs well alongside entertainment. Reels also cross-posts to the main feed, so the thumbnail frame (the still that displays in grid view) matters for brand aesthetics in ways it doesn’t on TikTok. Set your thumbnail frame to something visually striking that also represents the brand palette. Instagram’s Reels best practices documentation outlines current recommended specs.
YouTube Shorts
YouTube Shorts caps at 60 seconds and indexes on the same search infrastructure as long-form YouTube, meaning keyword-rich titles and descriptions carry more algorithmic weight here than on TikTok or Reels. Shorts can also drive subscribers and channel growth in ways the other platforms don’t — a well-optimized Short with a channel subscribe CTA in the caption can seed a long-form audience. YouTube’s Shorts creation guidelines cover format requirements and discovery factors.
Stories (Instagram and Snapchat)
Stories operate on a 24-hour cycle and reach existing followers rather than discovery audiences. Editing priorities shift accordingly: Stories can afford more context, more personal tone, and looser production values than Reels or Shorts. The editorial focus moves from hook-and-hook to building intimacy. Interactive elements — polls, question stickers, swipe-up links — are native to the Stories format and should be integrated into the edit plan, not applied as afterthoughts.
Color Grading Strategies for the Vertical Frame
Color grading for vertical content follows most of the same principles as any other format, but with a critical practical difference: your viewers will almost certainly be watching on a phone screen calibrated for vivid, high-saturation rendering. Phone displays (OLED panels especially) have wide color gamuts and high peak brightness — content that looks appropriately calibrated on a professional monitor can look washed-out or low-contrast on the phone screen your audience actually uses.
Monitoring for Mobile
The industry-standard approach is to final-check your grade on the actual target device — not just on a calibrated reference monitor. A quick quality control step of previewing your export on an iPhone or Android handset before delivery catches the most common mobile grading issues: blown highlights, crushed shadows, or skin tones that read differently in the phone’s color rendering engine. Professional colorists working exclusively on social content often keep a “social phone” specifically for this QC pass.
Look Development for Vertical
Vivid, high-contrast looks tend to perform well in vertical feeds — not because restraint is wrong, but because feed browsing is a split-second visual selection process. A desaturated, film-emulation grade that looks elegant on a cinema screen can read as flat and unengaging as a small autoplay thumbnail. That said, the look should be consistent across the brand’s vertical content library, functioning as a recognizable visual identity signal.
A reliable starting point for many brand vertical palettes: slightly lifted blacks (to counteract phone screen crushing in bright environments), pushed midtone saturation, and a warm primary light source balanced against a cool shadow tone. The specific values depend entirely on the brand’s visual language and the source footage — but the lift-midtone-contrast structure handles mobile display behavior better than flat, low-contrast grades in most contexts. Adobe’s color grading resources for Premiere Pro and DaVinci Resolve’s Color page documentation provide tooling reference for professional workflows.
Workflow and Tooling for Vertical Production
High-volume vertical content production — a common scenario for brands running always-on social strategies — requires a workflow that is fast, consistent, and repeatable. Ad-hoc vertical editing, where editors approach each clip from scratch, produces inconsistent results and unsustainable turnaround times.
NLE Setup and Template Discipline
Establish a vertical sequence preset in your NLE that locks in: 1080×1920 frame, 23.976fps or 29.97fps (match your source), proper color space (Rec.709 for most social content), and pre-built safe-zone guides. Store caption presets, branded text styles, and common transition presets in a shared project or template sequence that editors clone for each new clip. This template infrastructure is a one-time build that pays off across every vertical project that follows.
For teams managing multi-format production — a common scenario where the same content needs 16:9, 1:1, and 9:16 cuts — a nested sequence (Premiere) or compound clip (Final Cut Pro) workflow with format-specific sequences referencing a shared edit reduces triple-cut rework. The logic: make the structural creative decisions once in the master sequence, then apply format-specific reframing and safe-zone adjustments in the child sequences.
Export Settings
For most social platforms, export H.264 at 1080×1920, constant frame rate (29.97fps recommended for broad compatibility), bitrate between 10–16 Mbps VBR, stereo audio at 44.1kHz. Avoid HEVC/H.265 for TikTok uploads from desktop — platform processing can introduce artifacts on some encoder versions. Use MP4 container throughout. For Reels and Shorts, a slightly higher bitrate (12–16 Mbps) helps preserve fine detail through the platform’s own re-encode step.
DIY vs. Hiring a Specialist: When Does It Matter?
For individual creators publishing 2–5 clips per week, DIY vertical editing is entirely viable once the foundational craft is solid. The ceiling is time: as volume increases — to 15, 25, or 40+ clips per month — the self-editing model breaks down. Production quality also tends to plateau when the creator is simultaneously strategy, shoot, and edit.
For brands and agencies, the calculation shifts at volume. A team producing enough vertical content to justify a dedicated internal editor often finds that a specialist video editing agency delivers faster turnaround, more consistent quality across editors, and built-in vertical craft expertise — without the overhead of recruitment, training, software licensing, and management. The cost math typically favors outsourcing once the need exceeds roughly 8–12 hours of professional editing per week consistently. For more detail on how to evaluate the financial side, see our guide on how much professional video editing costs.
The craft gap that actually matters most in a DIY vs. agency comparison is not software knowledge — editors on both sides use the same tools — it is the accumulated pattern recognition that comes from editing thousands of clips across dozens of brand contexts. A specialist editor who has graded, paced, and structure-checked hundreds of vertical pieces catches issues — a caption sitting over a platform UI button, a pacing section where attention would drop, a color that looks off on OLED — before the clip is ever uploaded. That judgment is hard to fast-track and is where professional post-production earns its value. For a detailed look at how this plays out in practice, see our comparison of video editing agency vs. freelancer across different brand scenarios.
💡 Pro Tip: When briefing an external editor on vertical content, share a reference reel of 5–10 clips that represent the feel you’re targeting — not just technical specs. Craft decisions (pacing, text style, color temperature) are much faster to communicate visually than verbally. A well-curated reference reel can cut brief-revision cycles by a significant margin.
FAQ: Vertical Video Editing
What resolution should I export for 9:16 vertical video?
The standard is 1080×1920 pixels (1080p vertical). Most platforms accept up to 4K (2160×3840) but compress on upload anyway, so 1080p at a solid bitrate (10–16 Mbps) is the practical sweet spot for quality versus file size. Always export at your source frame rate — 23.976fps or 29.97fps are both widely supported.
Can I repurpose horizontal footage for vertical formats?
Yes, but with significant caveats. If the source is 4K or higher, you have usable resolution after cropping. Use position keyframing or AI reframe tools (Adobe Auto Reframe, DaVinci Smart Reframe) to follow subject motion through the vertical crop. Expect to spend meaningful time on quality-checking the reframe — automated tools handle straightforward single-subject shots well but struggle with multi-person scenes and rapid movement. For wide establishing shots or cinematic wide-angle footage, the reframe crop will often produce unusable compositions; plan for coverage with vertical-native alternatives.
How do I handle the platform UI overlay zones in my edit?
Add UI safe-zone guide overlays to your NLE sequence before editing begins — most professional editors maintain a custom guide preset for each target platform. Keep all essential visual information (faces, product details, key text) within the central safe zone: roughly 10–70% from top, clear of the rightmost 15%. The platforms’ own creator resource centers publish current safe zone dimensions, and these should be re-verified when platforms redesign their interfaces.
What frame rate works best for vertical social content?
29.97fps (30fps) is the most universally safe choice for social platforms and works well for talking-head and product content. 23.976fps (24fps) gives a cinematic motion cadence that suits brand storytelling and narrative content. 60fps is appropriate for sports, fast product demonstrations, or slow-motion source footage. Match your sequence to your source frame rate to avoid cross-frame blending artifacts, and export at the same rate you edit.
How many cuts per minute is “too fast” for vertical video?
There is no universal “too fast” — it depends on genre, audio context, and audience. High-energy music-driven content can cut every half-second; tutorial or instructional content typically cuts every 2–5 seconds. The reliable test is whether each cut serves a clear purpose: advancing information, shifting angle, or resetting attention. Random fast cutting that isn’t anchored to audio or narrative is fatiguing and tends to hurt completion rates rather than help them. Watch your completed cut on a phone in one sitting — when you feel yourself losing focus, that section needs attention.
Verdict: Mastering the 9:16 Edit
Vertical video editing is a distinct craft, not a simple format conversion. The editors who perform consistently at the top of short-form feeds are the ones who have internalized the platform’s visual grammar — the hook discipline, the safe zone awareness, the caption-as-audio mindset, the mobile-first color check — and apply it deliberately on every clip, not occasionally.
The learning curve is real but not long. Most editors with solid horizontal post-production skills can develop strong vertical instincts within a few months of high-volume vertical practice. The challenge for brands and agencies is rarely the craft knowledge — it is the throughput. Producing vertical content at the volume that modern social algorithms reward (multiple clips per week per platform) is a systems problem as much as a skills problem. Whether you solve that with internal resources, freelancers, or a dedicated post-production partner depends on your volume, consistency requirements, and available bandwidth.
At Increditors, we work with brands at exactly this junction — when the content strategy is clear, the creative direction is set, and the limiting factor is post-production throughput and craft consistency. Our editors specialize in vertical production alongside long-form work, operating with the platform-specific knowledge and template infrastructure that high-volume vertical content demands. If your team is producing more vertical content than it can reliably keep up with, we can help. For context on what a professional post-production engagement typically looks like financially, the top video editing services comparison for 2026 is a useful reference point.
Ready for Video That Actually Converts?
Tell us about your project and we will put together a custom plan.