









![3D Explainer Video - ScribbleLive.mp4_snapshot_00.12_[2022.03.09_03.14.16]](https://increditors.com/wp-content/uploads/elementor/thumbs/3D-Explainer-Video-ScribbleLive.mp4_snapshot_00.12_2022.03.09_03.14.16-r7wb53mx72rxst3qcqyrfxdmeyzb5r9jbl0wbjujh4.png "3D Explainer Video – ScribbleLive.mp4_snapshot_00.12_[2022.03.09_03.14.16]")




























A rough cut is the second formal stage of video editing — after the assembly cut and before the fine cut — where story structure is locked but polish is absent. Clients who understand all five edit stages (assembly, rough cut, fine cut, picture lock, and color/audio finish) give better feedback, move faster through revisions, and avoid the costly mistakes that come from requesting layout changes after picture lock.
- What Is a Rough Cut in Video Editing?
- Every Edit Stage, Defined
- A Stage-by-Stage Review Guide for Clients
- How to Give Feedback That Actually Speeds Up the Edit
- Revision Rounds Explained
- Picture Lock — The Point of No Return
- Working With a Remote Editing Team: A Client Checklist
- Frequently Asked Questions
What Is a Rough Cut in Video Editing?
A rough cut is the edited version of your video where the full story structure is in place but the execution is deliberately unfinished. Pacing may feel slightly loose, some placeholder music may still be in, colour is untouched, and certain graphics might be absent or at draft quality. It is not a mistake — it is a specific deliverable, designed to let you review the architecture of the edit before the team invests hours in polish that might need to change.
The term comes from traditional film editing, where editors would physically cut and tape celluloid strips together in a rough sequence. Modern non-linear editing software like Adobe Premiere Pro or DaVinci Resolve has replaced the tape, but the concept is identical: the rough cut is your first real look at how the footage has been shaped into a coherent piece. Every professional video editing agency delivers some version of this milestone before fine-tuning begins.
Understanding what a rough cut represents — and what it does not — is one of the most valuable things a client can learn. Teams that grasp this early move through post-production faster, spend fewer revision rounds on structural issues, and end up with better final videos. Teams that treat the rough cut as a near-finished product consistently end up frustrated, because they are evaluating the wrong things at the wrong time.
The Purpose of the Rough Cut
The rough cut exists to answer one question: does the story work? Not “does it look beautiful?” or “is the grade on brand?” — those come later. The rough cut asks whether your interview bites are in the right order, whether the narrative arc makes sense, whether the pacing holds the viewer’s attention, and whether the overall message lands. All of these are structural decisions that must be resolved before any cosmetic work begins.
Editors deliberately withhold polish at this stage — not because they cannot do it yet, but because applying colour grades and sound design to a structure that might change is waste. If you decide after seeing the rough cut that the first interview clip should move to a different section, the editor needs to re-grade and re-mix that clip in its new context anyway. Doing that work twice is the kind of inefficiency that inflates budgets and delays deadlines.
What a Rough Cut Looks Like (and What It Does Not)
Expect the rough cut to be longer than the final video — often by ten to thirty percent. Editors tend to include more material than needed so you can both agree on what to cut, rather than discovering later that a section was removed prematurely. You will likely see basic cuts between clips with no transitions, music that is either absent, low-quality placeholder audio, or temporary tracks the editor uses for pacing reference. Graphics may be represented by text placeholders. Colour correction will not have been applied, so the footage may appear flat or inconsistently exposed.
None of this is a problem. It is a feature of the process. The editor is presenting the skeleton of the video — and you are being asked to approve that skeleton before anyone builds the walls and paints the rooms. Asking whether the colour looks right at the rough cut stage is like asking an architect whether the kitchen tiles look nice on a blueprint.
💡 Pro Tip: When watching a rough cut, mute the audio if temporary placeholder music is distracting you. Focus entirely on whether the story structure makes sense, whether the right moments are included, and whether the overall arc matches your brief. Sound comes later.
Every Edit Stage, Defined
Most professional post-production workflows pass through five distinct stages between raw footage and final delivery. Understanding each one gives you a clear map of where you are in the process at any given moment, and what decisions belong at each checkpoint. This breakdown applies equally to corporate films, brand videos, documentary-style content, social series, and event highlights — the terminology is universal across the industry.
These stages are not arbitrary checkpoints invented by editors to delay delivery. They reflect the logical dependency chain of editorial decisions: structure must come before pacing, pacing before sound design, sound before colour, and colour before final export. Each stage unlocks the next. Skipping one does not save time — it creates rework that costs more time later. To understand where editing fits within the broader production lifecycle, see our guide on what video post-production actually involves.
Stage 1: The Assembly Cut (String-Out)
The assembly cut — also called a string-out or paper cut — is the editor’s first pass at organising all usable footage into a rough sequence. Every usable clip is placed on the timeline in approximately the right order. Nothing has been tightened. Nothing has been removed for pacing. The goal is simply to take raw chaos and impose a working order on it. An assembly cut for a five-minute brand video might run fifteen to twenty minutes at this stage.
Most professional editors do not share the assembly cut with clients. It is an internal working document — more like a spreadsheet than a presentation. Some editors will share it on request if you want complete transparency into the process, but be aware that reviewing it requires you to mentally filter out a significant amount of material that the editor will remove before delivering the rough cut. If your editor does share an assembly cut, the right question to ask is: “Is anything missing?” not “Can we cut this down?” That work is already in progress.
Stage 2: The Rough Cut
The rough cut is the first deliverable intended for client review. By this stage, the editor has made substantive story decisions: which interview segments to use, the order of scenes, the rough duration of each section, and the basic narrative arc. Placeholder music may be in place for pacing. Graphics and transitions are minimal or absent. The rough cut runs closer to the target duration than the assembly cut — typically within twenty to thirty percent of the final length.
Your job when reviewing a rough cut is structural. Is the story working? Are the right moments included? Does the pace feel broadly right for the platform and audience? Are any important messages missing? These are the questions worth answering at this stage. The rough cut review is not the time to note that a particular shot is slightly overexposed or that the lower-third animation style is not quite right — both of those belong to later stages.
Stage 3: The Fine Cut
The fine cut incorporates the structural feedback from the rough cut review and begins the polishing process. Pacing is tightened — individual clips are trimmed to the frame. Music is selected (or confirmed final). Transitions are applied. Placeholder graphics are replaced with designed versions. The fine cut should look and feel close to the final video in terms of structure and execution, though colour grading and full sound mixing may still be ongoing.
Feedback at the fine cut stage should focus on execution details: is the music right? Are the transitions working? Does the pacing feel tight enough? Are the graphics on brand? These are legitimate fine-cut notes. Requesting significant structural changes — rearranging sections, removing an entire interview, changing the narrative order — at the fine cut stage creates significant rework and can delay delivery by days rather than hours.
Stage 4: Picture Lock
Picture lock is the formal approval that the edit is finished. Every cut, every clip, every timing decision is now fixed. After picture lock, the edit is handed to the sound designer for the final audio mix and to the colourist for the final grade. Both of these specialists work on the assumption that the edit will not change — they build their work to specific timecodes. Any change after picture lock — even moving a clip by half a second — requires those specialists to redo portions of their work.
Picture lock is a formal checkpoint, not an informal agreement. When you approve picture lock, you are confirming that all editorial decisions have been made and reviewed. Most professional contracts treat post-lock changes as out-of-scope work that incurs additional fees, because they genuinely do generate additional work across multiple disciplines.
Stage 5: Final Delivery (Colour, Audio, and Export)
After picture lock, the video enters finishing. Colour grading creates the visual mood and ensures consistency across all shots. The audio mix balances dialogue, music, and effects, and applies mastering for the delivery platform. Final export renders the video to specification — resolution, codec, frame rate, and delivery format. At this stage, your involvement is typically limited to approving the finished deliverable. Minor adjustments to colour temperature or audio levels are possible; structural changes are not.
A Stage-by-Stage Review Guide for Clients
The most common cause of revision delays is mismatched expectations about what should be reviewed at each stage. Clients who scrutinise colour at the rough cut stage and then request structural changes at the fine cut stage effectively double the editor’s workload. The table below maps exactly what is appropriate to review — and what to defer — at each checkpoint.
Think of each stage as a closing door. Once you move past the rough cut, the structural door closes. Once you pass picture lock, the editorial door closes. Each door closing is what enables the next stage to happen efficiently. Trying to hold multiple doors open simultaneously — reviewing colour while still debating structure — is the primary driver of post-production overruns on client-managed projects.
How to Give Feedback That Actually Speeds Up the Edit
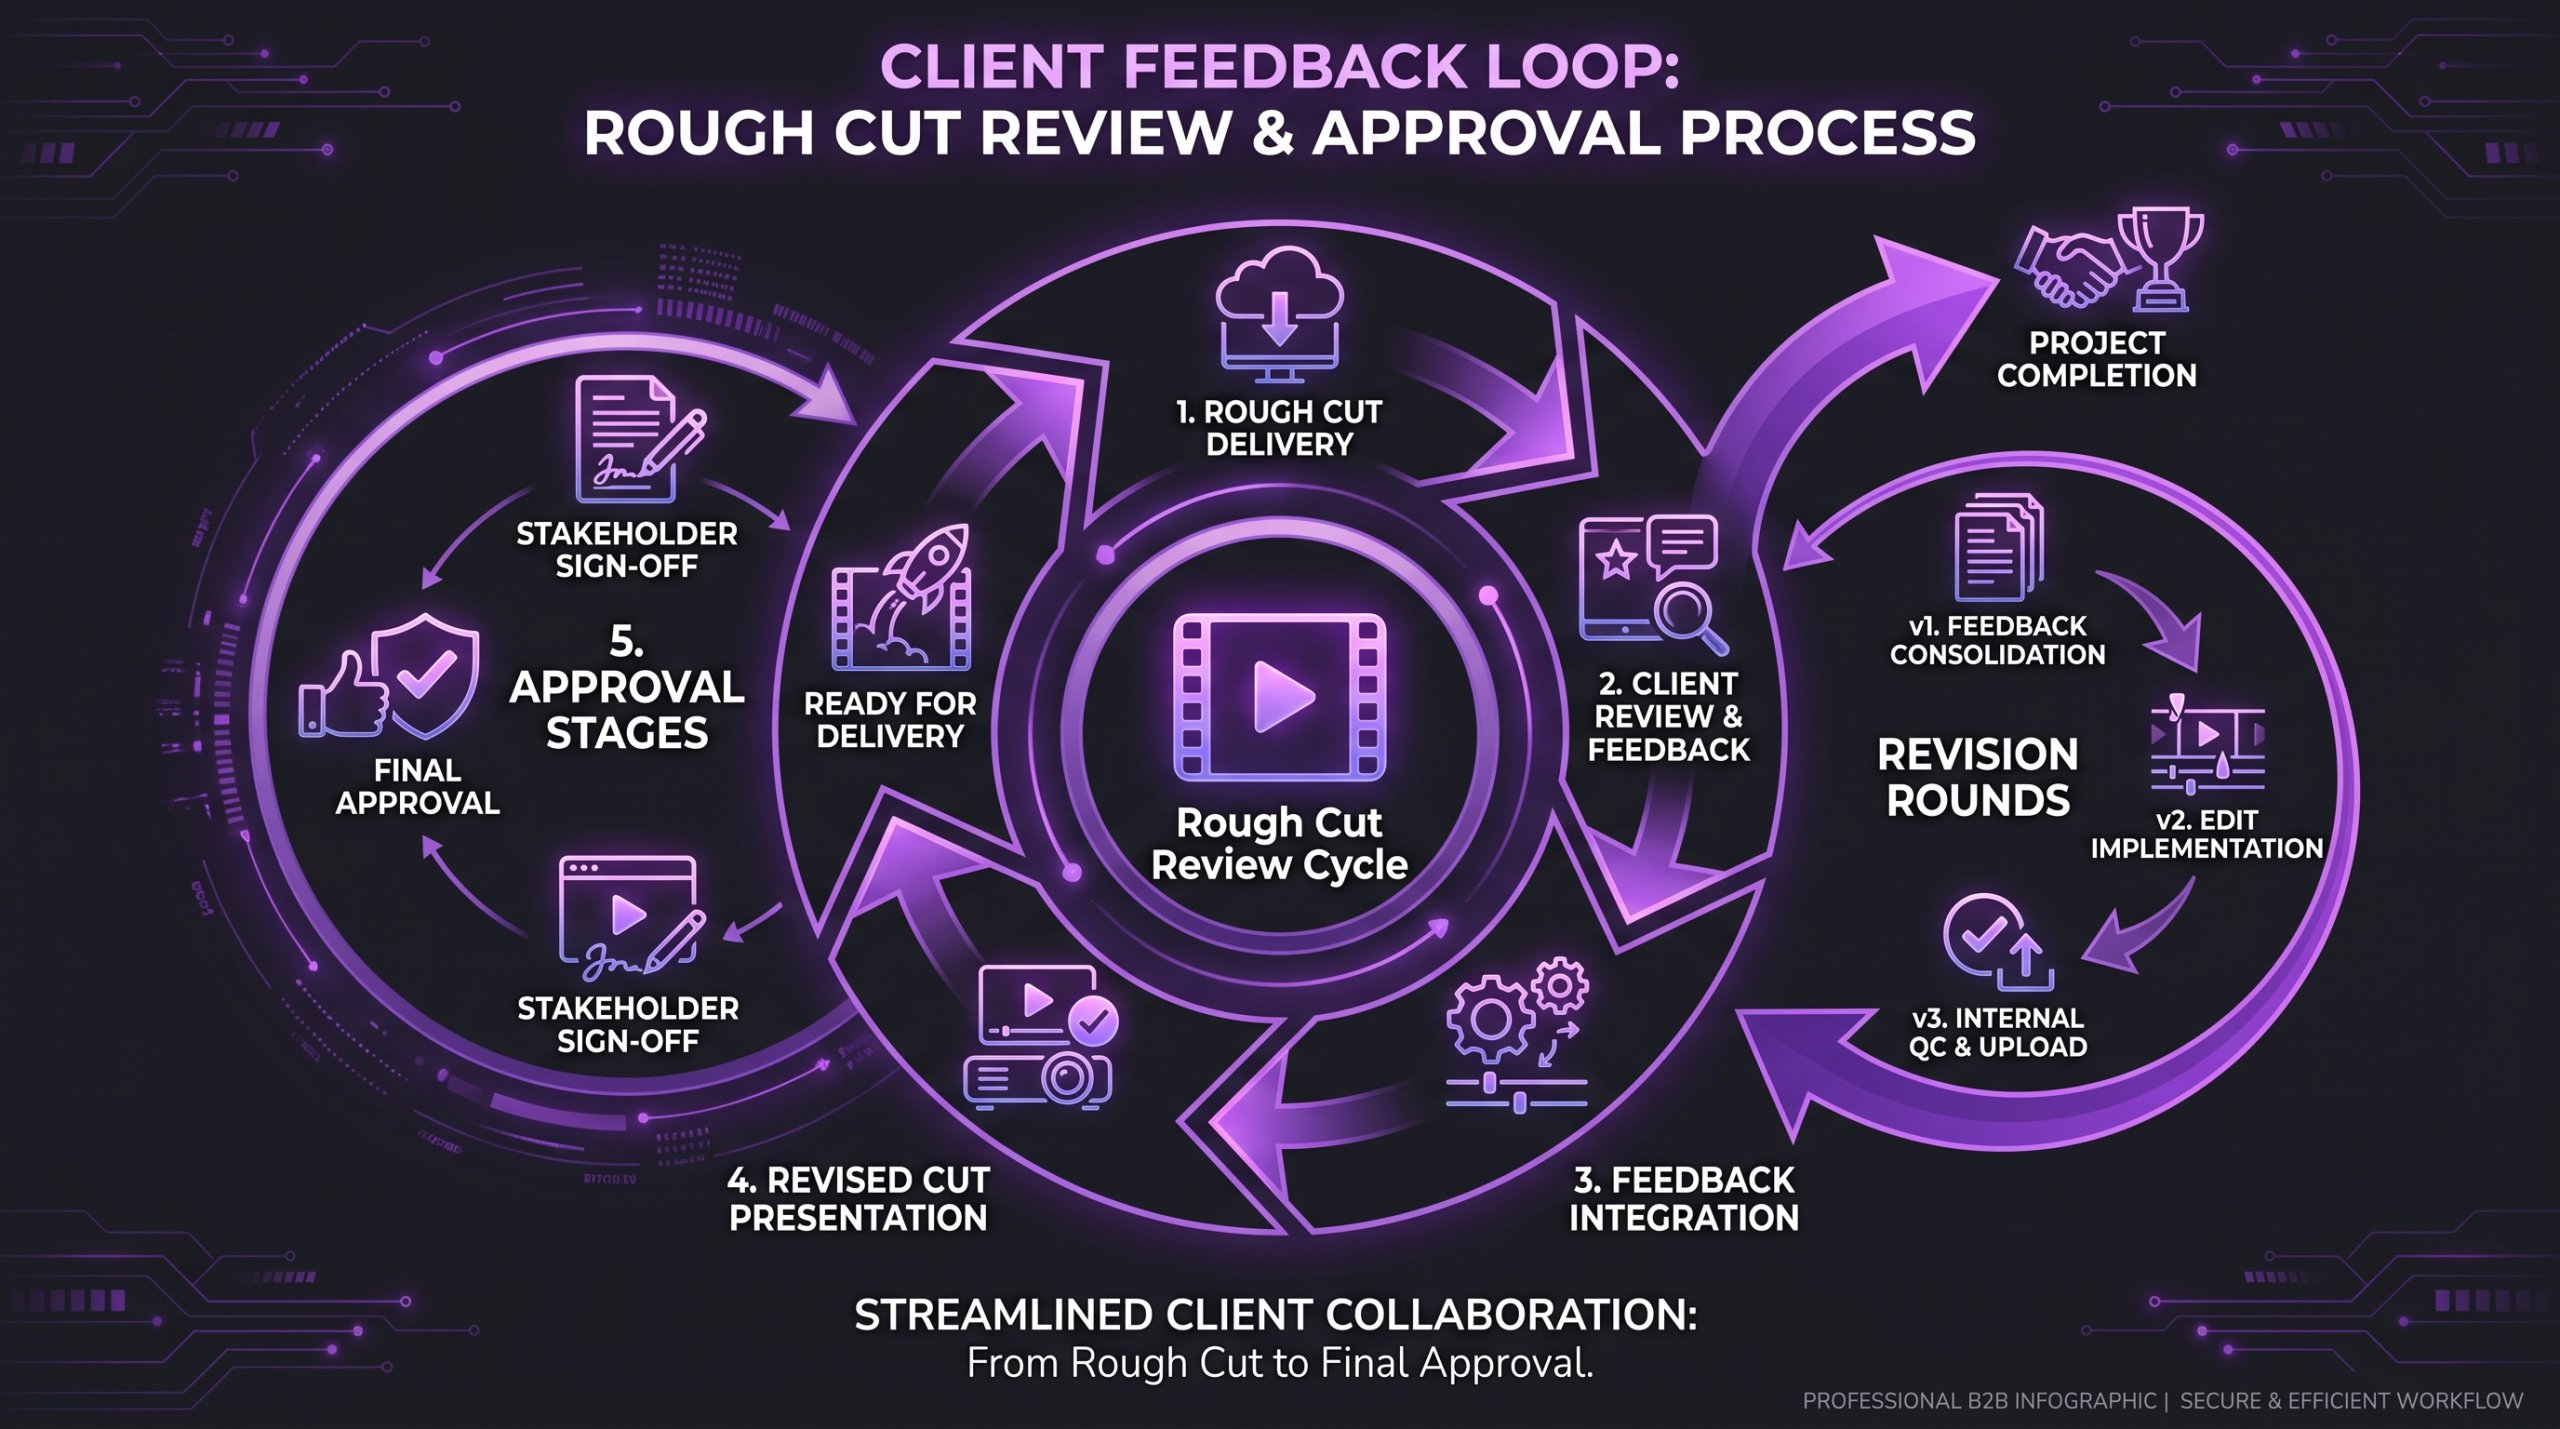
Effective feedback at the rough cut stage is specific, structural, and prioritised. Vague feedback — “it feels slow” or “I’m not sure about this section” — is difficult to act on without a follow-up conversation. Specific feedback — “the intro runs too long before the product is shown; consider cutting the first thirty seconds” — gives the editor a clear directive they can implement without interpretation. The difference between those two types of notes is often the difference between one revision round and three.
Frame Feedback Around Story and Intent, Not Aesthetics
At the rough cut stage, the most valuable feedback centres on intent: does the video achieve what it was supposed to achieve? Rather than saying “I don’t like that clip,” try “that clip doesn’t demonstrate the product benefit we discussed in the brief — can we replace it with the footage from scene four?” The first note is an opinion. The second is an editorial directive backed by the original creative brief. Editors can work with the second type instantly.
A useful practice is to re-read your original brief before watching the rough cut. Then watch the video with a single question in mind: “Does this video achieve the goal we stated in the brief?” Any gap between the brief and the edit is a legitimate rough cut note. Anything that goes beyond the brief — new ideas, creative directions that weren’t discussed, messaging that wasn’t in the original scope — should be noted separately and discussed as a potential scope change before the editor acts on it.
Consolidate Stakeholder Notes Before Sending
One of the most common causes of extended revision cycles is unconsolidated feedback. When a marketing manager sends notes on Monday, a brand director adds conflicting notes on Wednesday, and the CEO requests changes on Friday, the editor has to navigate three sets of potentially contradictory instructions. This is not an editing problem — it is a client-side process problem, and it adds revision rounds that have nothing to do with the quality of the edit.
Professional editing teams consistently recommend that clients nominate a single point of contact for feedback consolidation — one person who gathers notes from all stakeholders, resolves internal disagreements, and delivers a single, unified set of instructions. This one practice alone can reduce revision rounds by a meaningful amount on complex projects. Review platforms like Frame.io and similar tools make consolidation easier by giving teams a shared space to comment on timestamped sections of the video before notes are compiled.
💡 Pro Tip: Before sending rough cut feedback, ask yourself: “Is this note about whether the story works, or is it a personal preference about a stylistic choice that will be refined later?” Story notes = send now. Stylistic preferences = wait for the fine cut.
What Happens When Clients Change Direction Mid-Edit
Direction changes mid-edit — where the client decides to take the video in a fundamentally different direction after the rough cut has been delivered — are common, understandable, and expensive. They happen for legitimate reasons: stakeholder opinions shift, a product feature changes, a campaign strategy evolves. But they do create real costs that are worth understanding before they occur.
When a direction change happens after the rough cut, the editor must effectively restart from the assembly cut stage. The time already invested in the original rough cut is not recoverable. Depending on how far along the project was and how significant the direction change is, this can add anywhere from several hours to several days of additional work. Most contracts handle this with a re-cut clause or change order process — which is why the best time to identify direction uncertainty is before the edit starts, not after. Reviewing the original brief with all decision-makers before any editing begins is time invested that pays back several times over.
Revision Rounds Explained
A revision round is a single cycle of feedback and implementation. You watch the current version, send your notes, the editor implements those notes, and returns a new version. That complete cycle is one round. Most professional editing agreements include a set number of revision rounds per stage — commonly two to three rounds per deliverable, though this varies by project type, agency, and contract structure.
Understanding what counts as a revision — and what counts as a new request — is important because the two are handled differently in most agreements. A revision is an implementation of feedback on the existing brief. A new request is something that goes beyond the original scope: adding footage that wasn’t shot, creating a new version of the video for a different platform, changing the fundamental narrative direction. Revisions are typically included in the agreed scope. New requests typically are not, and are scoped and quoted separately. The clearer your original brief, the less ambiguity there is about where the boundary sits.
What Counts as a Revision vs. a New Request
The distinction is not always obvious, and different agencies draw the line in different places. As a general guide: anything that requires implementing feedback on the agreed brief is a revision. Anything that requires going beyond that brief — adding a new scene, requesting a different version, incorporating footage that wasn’t in the original shoot — is a new request. When in doubt, the best approach is to ask your editing team directly before assuming a request falls within the existing agreement.
How to Use Your Revision Rounds Strategically
If your agreement includes two revision rounds per stage, treat each round as a dedicated focus area rather than a catch-all pass. Use round one for structural or content feedback — the things that have to be right before anything else matters. Use round two for refinements and confirmations — checking that round one notes were implemented correctly and catching anything that was missed. This approach consistently produces better results than sending notes piecemeal across multiple partial passes.
If you find yourself needing more rounds than agreed, take it as diagnostic information rather than a scheduling problem. Consistent overruns on revision rounds usually indicate one of three things: the brief was not specific enough, internal stakeholder alignment was incomplete before the project started, or the edit stage expectations were not clear. Addressing the root cause is more effective than simply requesting additional rounds. For a broader view of how post-production budgets are structured, see our breakdown on how much professional video editing costs.
Picture Lock — The Point of No Return
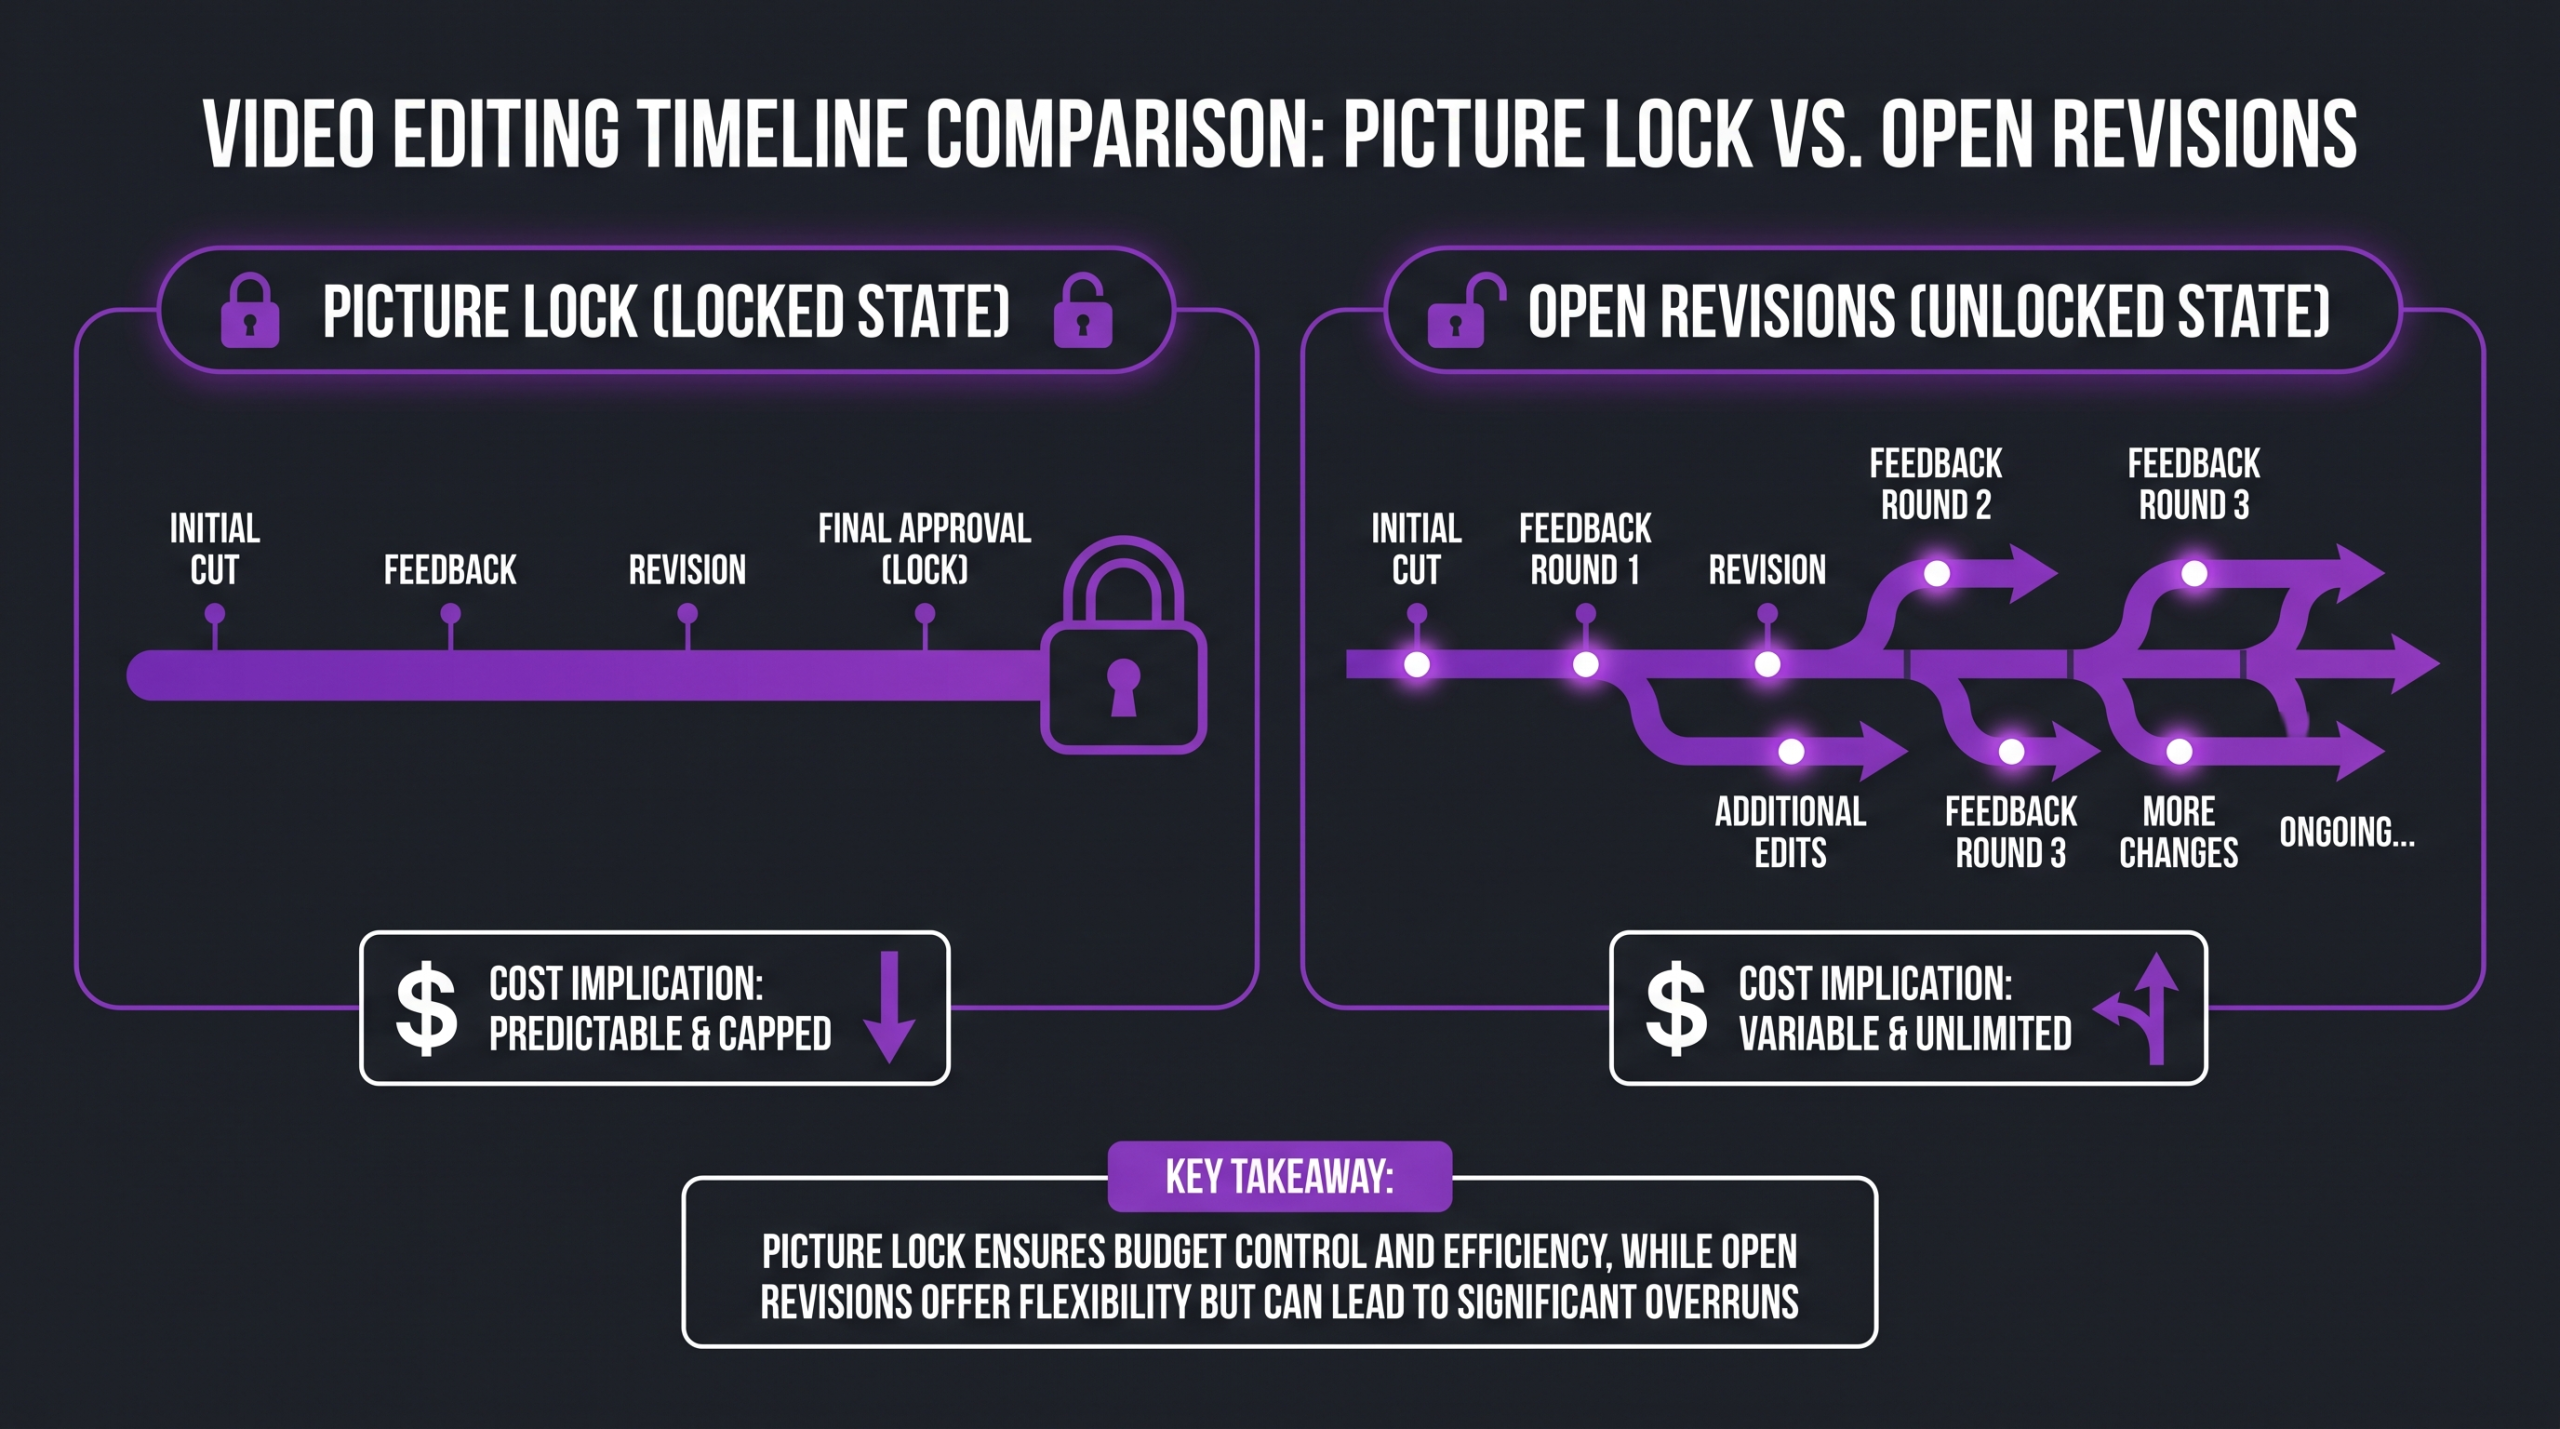
Picture lock is the most consequential approval you will give during a post-production project. Once the edit is locked, it becomes the foundation on which all subsequent finishing work is built. The sound designer maps their session to the locked timeline. The colourist grades every shot in its final position and duration. If anything in the edit changes after that point, both specialists must revise their work — and revisions to finishing work are not simple tweaks.
What Happens After Picture Lock
After picture lock, the project enters the finishing pipeline. A sound designer or audio engineer takes the locked cut and builds the full audio mix: balancing dialogue levels, placing ambient sound, integrating sound effects, and applying music at the correct levels and fade points for the platform. This is detailed, time-sensitive work that requires the edit to stay fixed — each audio cue is placed relative to a specific frame.
Simultaneously or subsequently, the colourist grades each shot against the locked timeline. Colour grading for a polished brand video involves creating and applying custom look-up tables (LUTs), matching shots across different camera positions or lighting conditions, and creating the specific visual mood that the creative brief called for. Colour grading is done shot by shot in many cases, and any change to the edit — even swapping a clip for a slightly different take — means the new clip has to be graded from scratch in context.
The Real Cost of Reopening a Locked Edit
Post-lock changes are not impossible — they happen. But they carry costs that clients often underestimate. Moving a clip by two seconds after picture lock means the audio mix must be adjusted (everything after that timecode shifts), the colour grade for the moved clip must be re-applied in its new context, and the export must be re-rendered. What feels like a “small change” to a client can represent several hours of finishing work across two or three specialists.
This is why thorough review at the fine cut stage is worth the time it takes. The American Cinema Editors — the professional guild for film and television editors — has long emphasised the picture lock convention as a discipline of craft, not bureaucracy. It protects the quality of the finished work by ensuring that finishing specialists can do their jobs without a moving target. Treating picture lock as a genuine creative deadline, rather than an administrative formality, is one of the marks of an experienced video production client.
How to Minimise Post-Lock Change Requests
The most reliable way to avoid post-lock changes is to conduct a comprehensive fine cut review before approving picture lock. This means not just watching the video once — it means watching it with each stakeholder who has approval authority, checking every piece of text on screen for accuracy, confirming all legal or compliance requirements are met, and verifying that the video works on the platform it will be published on (including any aspect ratio or duration requirements).
A simple pre-lock checklist can prevent the majority of post-lock requests: Does every piece of text on screen read correctly? Is the duration within platform requirements? Are all logos and brand elements correct? Does the call to action land clearly? Is there anything in the video that could create a legal or compliance issue? Running through this checklist with your team before approving picture lock takes thirty minutes and can save days of rework.
Working With a Remote Video Editing Team: A Client Checklist
The edit-stage framework described above applies equally when working with an in-house team and when working with a remote editing partner. Remote collaboration introduces one additional variable: communication clarity matters even more because you cannot resolve ambiguity in a hallway conversation. The checklist below organises the most important client-side actions by project phase.
Before the First Rough Cut
Share a written brief that specifies the intended audience, the platform the video will be published on, the core message, the emotional tone, the target duration, and any mandatory elements (logo placement, required voiceover lines, specific calls to action). Share reference videos that demonstrate the style or tone you want — not just description, but examples. Confirm who has final approval authority and who is the single point of contact for feedback. Share all footage, assets, and music references before the edit starts. These inputs determine the quality and alignment of the rough cut before a single frame is edited.
During the Review Process
Set a clear internal deadline for feedback — typically 48 hours from when the deliverable arrives. Longer review windows compress the editing schedule and increase the likelihood that new stakeholder opinions will surface that need to be resolved before notes can be sent. Use timestamped comments wherever possible so the editor can locate exactly what you are referring to without interpretation. Group your notes by type: structural notes (cut this, move that) first, then execution notes (music, graphics), then final checks. Send a single, consolidated set of notes per round — not rolling updates over several days. Confirm which notes have been addressed in the returned version before starting a new round of feedback.
At Picture Lock and Beyond
Treat picture lock approval as a formal decision, not a rubber stamp. Gather all stakeholders, run through the pre-lock checklist described above, and make the approval deliberate. After picture lock, limit communication with the editing team to technical delivery questions (export specs, platform requirements) and finishing approvals (colour grade review, audio level check). Understand that any request to re-open the edit at this stage is likely to be scoped as additional work. The goal is not to be inflexible — it is to be deliberate, so that the finishing team can do their best work on a stable foundation.
Teams that work with an experienced video editing agency versus a freelancer often find the process easier to navigate because agencies have established workflows for each of these stages — from rough cut delivery protocols to picture lock confirmation processes. At Increditors, each project has a dedicated senior editor who guides clients through every stage with clear expectations set from the start, so the process feels collaborative rather than bureaucratic.
Frequently Asked Questions
How long does a rough cut usually take to produce?
Production time for a rough cut depends on the volume of source footage, the complexity of the project, and the editor’s familiarity with the brief. A two-minute brand video with a day’s worth of footage might yield a rough cut in two to three business days. A ten-minute documentary with weeks of footage might take considerably longer. Your editing team should give you a realistic timeline before starting, and that timeline should include the assembly cut phase that precedes the rough cut delivery.
Is a rough cut the same as a first draft?
Not exactly. In writing, a first draft is typically a complete version that is simply rough in quality. In video editing, the rough cut is a specific stage that follows the assembly cut and precedes the fine cut. It is more structured than a first draft analogy suggests — the rough cut contains deliberate editorial decisions about story structure, even if polish is absent. Some editors use “first cut” and “rough cut” interchangeably; the key is to ask your editor what is included at the version they are delivering and what feedback is appropriate at that stage.
What should I do if the rough cut does not match my brief at all?
If the rough cut misses the brief significantly, address it immediately and specifically. Do not work around the problem by requesting incremental changes that move toward the correct direction — go back to the brief directly, identify exactly where the disconnect is (wrong tone, wrong structure, wrong message), and communicate that clearly. Professional editing teams prefer to learn about a fundamental misalignment early, because addressing it at the rough cut stage is significantly faster and less costly than trying to correct it at the fine cut or beyond.
Can I skip directly from rough cut to final delivery?
In theory, yes — for very simple, short projects with minimal complexity and a very clear brief. In practice, skipping the fine cut stage on anything longer than thirty seconds or involving multiple elements (graphics, music, voiceover, colour) increases the risk that errors reach the final version. The fine cut exists to catch exactly the kind of execution issues that only become apparent once the structure is settled. Skipping it is a risk decision, not a time-saving one.
How is a rough cut different from a director’s cut?
A director’s cut is a specific version of a film that reflects the director’s original vision before studio or distributor edits are applied. It is a concept from narrative film and does not directly apply to commercial or brand video production. In a commercial context, the rough cut is the editor’s initial structural pass delivered for client review — there is typically no separate director’s cut unless the brief specifically calls for multiple creative interpretations to be developed in parallel. The Screenskills guide to professional editing roles provides useful context on how post-production roles divide in film and television versus commercial production.
Verdict: Why Understanding Edit Stages Pays Off
The clients who get the best results from professional video editing are almost always the ones who understand what stage they are in and what decisions belong there. The rough cut is not a failure to deliver a finished product — it is an invitation to shape the story before it sets. The fine cut is not the time for structural debates — it is the time to confirm execution. Picture lock is not bureaucracy — it is the foundation on which quality finishing is built.
When clients treat each stage as its own distinct creative conversation — asking the right questions at the right time — the post-production process moves faster, produces better work, and costs less in revision time. When stages are conflated, or when feedback from a later stage bleeds back into an earlier one, the process expands unpredictably. The editorial discipline that professional teams bring to each stage is not gatekeeping — it is the mechanism by which good videos actually get made efficiently.
If you are planning a video project and want a team that walks you through every stage with clear communication and genuine editorial expertise, read our overview of what video post-production involves next — it covers the broader production workflow, of which the edit stages described here are one chapter. For agencies, SaaS companies, and brands that produce video regularly, working with a partner who can run this process consistently and at scale makes the difference between a functional content operation and a chaotic one. Explore what that looks like at our guide to professional video editing services.
Ready for Video That Actually Converts?
Tell us about your project and we will put together a custom plan.