








![3D Explainer Video - ScribbleLive.mp4_snapshot_00.12_[2022.03.09_03.14.16]](https://increditors.com/wp-content/uploads/elementor/thumbs/3D-Explainer-Video-ScribbleLive.mp4_snapshot_00.12_2022.03.09_03.14.16-r7wb53mx72rxst3qcqyrfxdmeyzb5r9jbl0wbjujh4.png "3D Explainer Video – ScribbleLive.mp4_snapshot_00.12_[2022.03.09_03.14.16]")





























Post-production is where most video projects either succeed or quietly fall apart. This 25-step checklist walks you through every phase — from raw footage ingest to final export — so your team delivers a polished, on-brand video on time, every time. Bookmark it, share it with your editors, and run it on every production regardless of budget.
- What Post-Production Actually Covers
- Why a Formal Checklist Prevents Costly Revisions
- Phase 1 — Organization and Project Setup (Steps 1–5)
- Phase 2 — Rough Cut and Assembly (Steps 6–10)
- Phase 3 — Picture Lock and Visual Polish (Steps 11–16)
- Phase 4 — Audio, Music, and Sound Mix (Steps 17–20)
- Phase 5 — Color Grading and Graphics (Steps 21–23)
- Phase 6 — Final Review and Delivery (Steps 24–25)
- Post-Production Checklist by Video Type
- DIY vs. Agency Post-Production: What the Checklist Reveals
- Frequently Asked Questions
- Verdict
What Post-Production Actually Covers
Post-production is everything that happens after the camera stops rolling. It is the phase where raw footage, audio recordings, graphics files, and licensed music are assembled into a single, coherent video asset. For a marketing director overseeing video content at a growing company, understanding post-production’s scope is not optional — it is how you forecast timelines, budget revisions, and hold production partners accountable.
Post-production broadly includes six domains: editorial (cutting and structuring footage), audio (dialogue cleanup, music, mixing), graphics (motion graphics, titles, animations), color (correction and grading), quality control (technical and editorial sign-off), and delivery (format-specific exports). Each domain has its own craft, toolset, and failure modes. When any one of them is skipped or rushed, the final video reflects it — and reshoots or re-edits cost multiples of what a systematic upfront process would have.
The checklist below covers all six domains across 25 discrete, actionable steps. It is written for teams working in Adobe Premiere Pro, DaVinci Resolve, or any professional NLE — the principles are universal regardless of the software stack.
Why a Formal Checklist Prevents Costly Revisions
Most post-production disasters are not caused by bad editors. They are caused by unclear process. A department head approves a cut before the audio mix is final. A subtitle file is generated before picture lock, then re-exported twice. Motion graphics are built to the wrong aspect ratio. Music is added before the licensing agreement is confirmed.
A checklist does not replace skilled judgment — it protects it. When each phase has a defined exit condition, teams move in one direction: forward. Without one, projects loop: “can we adjust the color before the final audio mix?” or “let’s just tweak the cut one more time.” Those loops are expensive, and at scale they erode the working relationship between marketing, production, and the editing team.
💡 Pro Tip: Run this checklist as a shared Google Sheet with your editor and one internal stakeholder. Each step gets a status (To Do / In Review / Signed Off) and an owner. When everyone can see where the project stands, revision conversations become sign-off conversations — a subtle but significant shift.
For companies running more than 10 video productions per quarter, systematizing post-production is often the single highest-leverage operational improvement available. It directly reduces turnaround times, lowers per-video revision costs, and makes it possible to scale output without sacrificing quality. That is the practical case for the 25-step checklist that follows.
Phase 1 — Organization and Project Setup (Steps 1–5)
The single most common reason post-production runs late is a disorganized project at the start. Investing 30–60 minutes on setup pays back hours of searching, re-rendering, and miscommunication later. These five steps are non-negotiable before any cutting begins.
Step 1 — Ingest and Log All Raw Footage
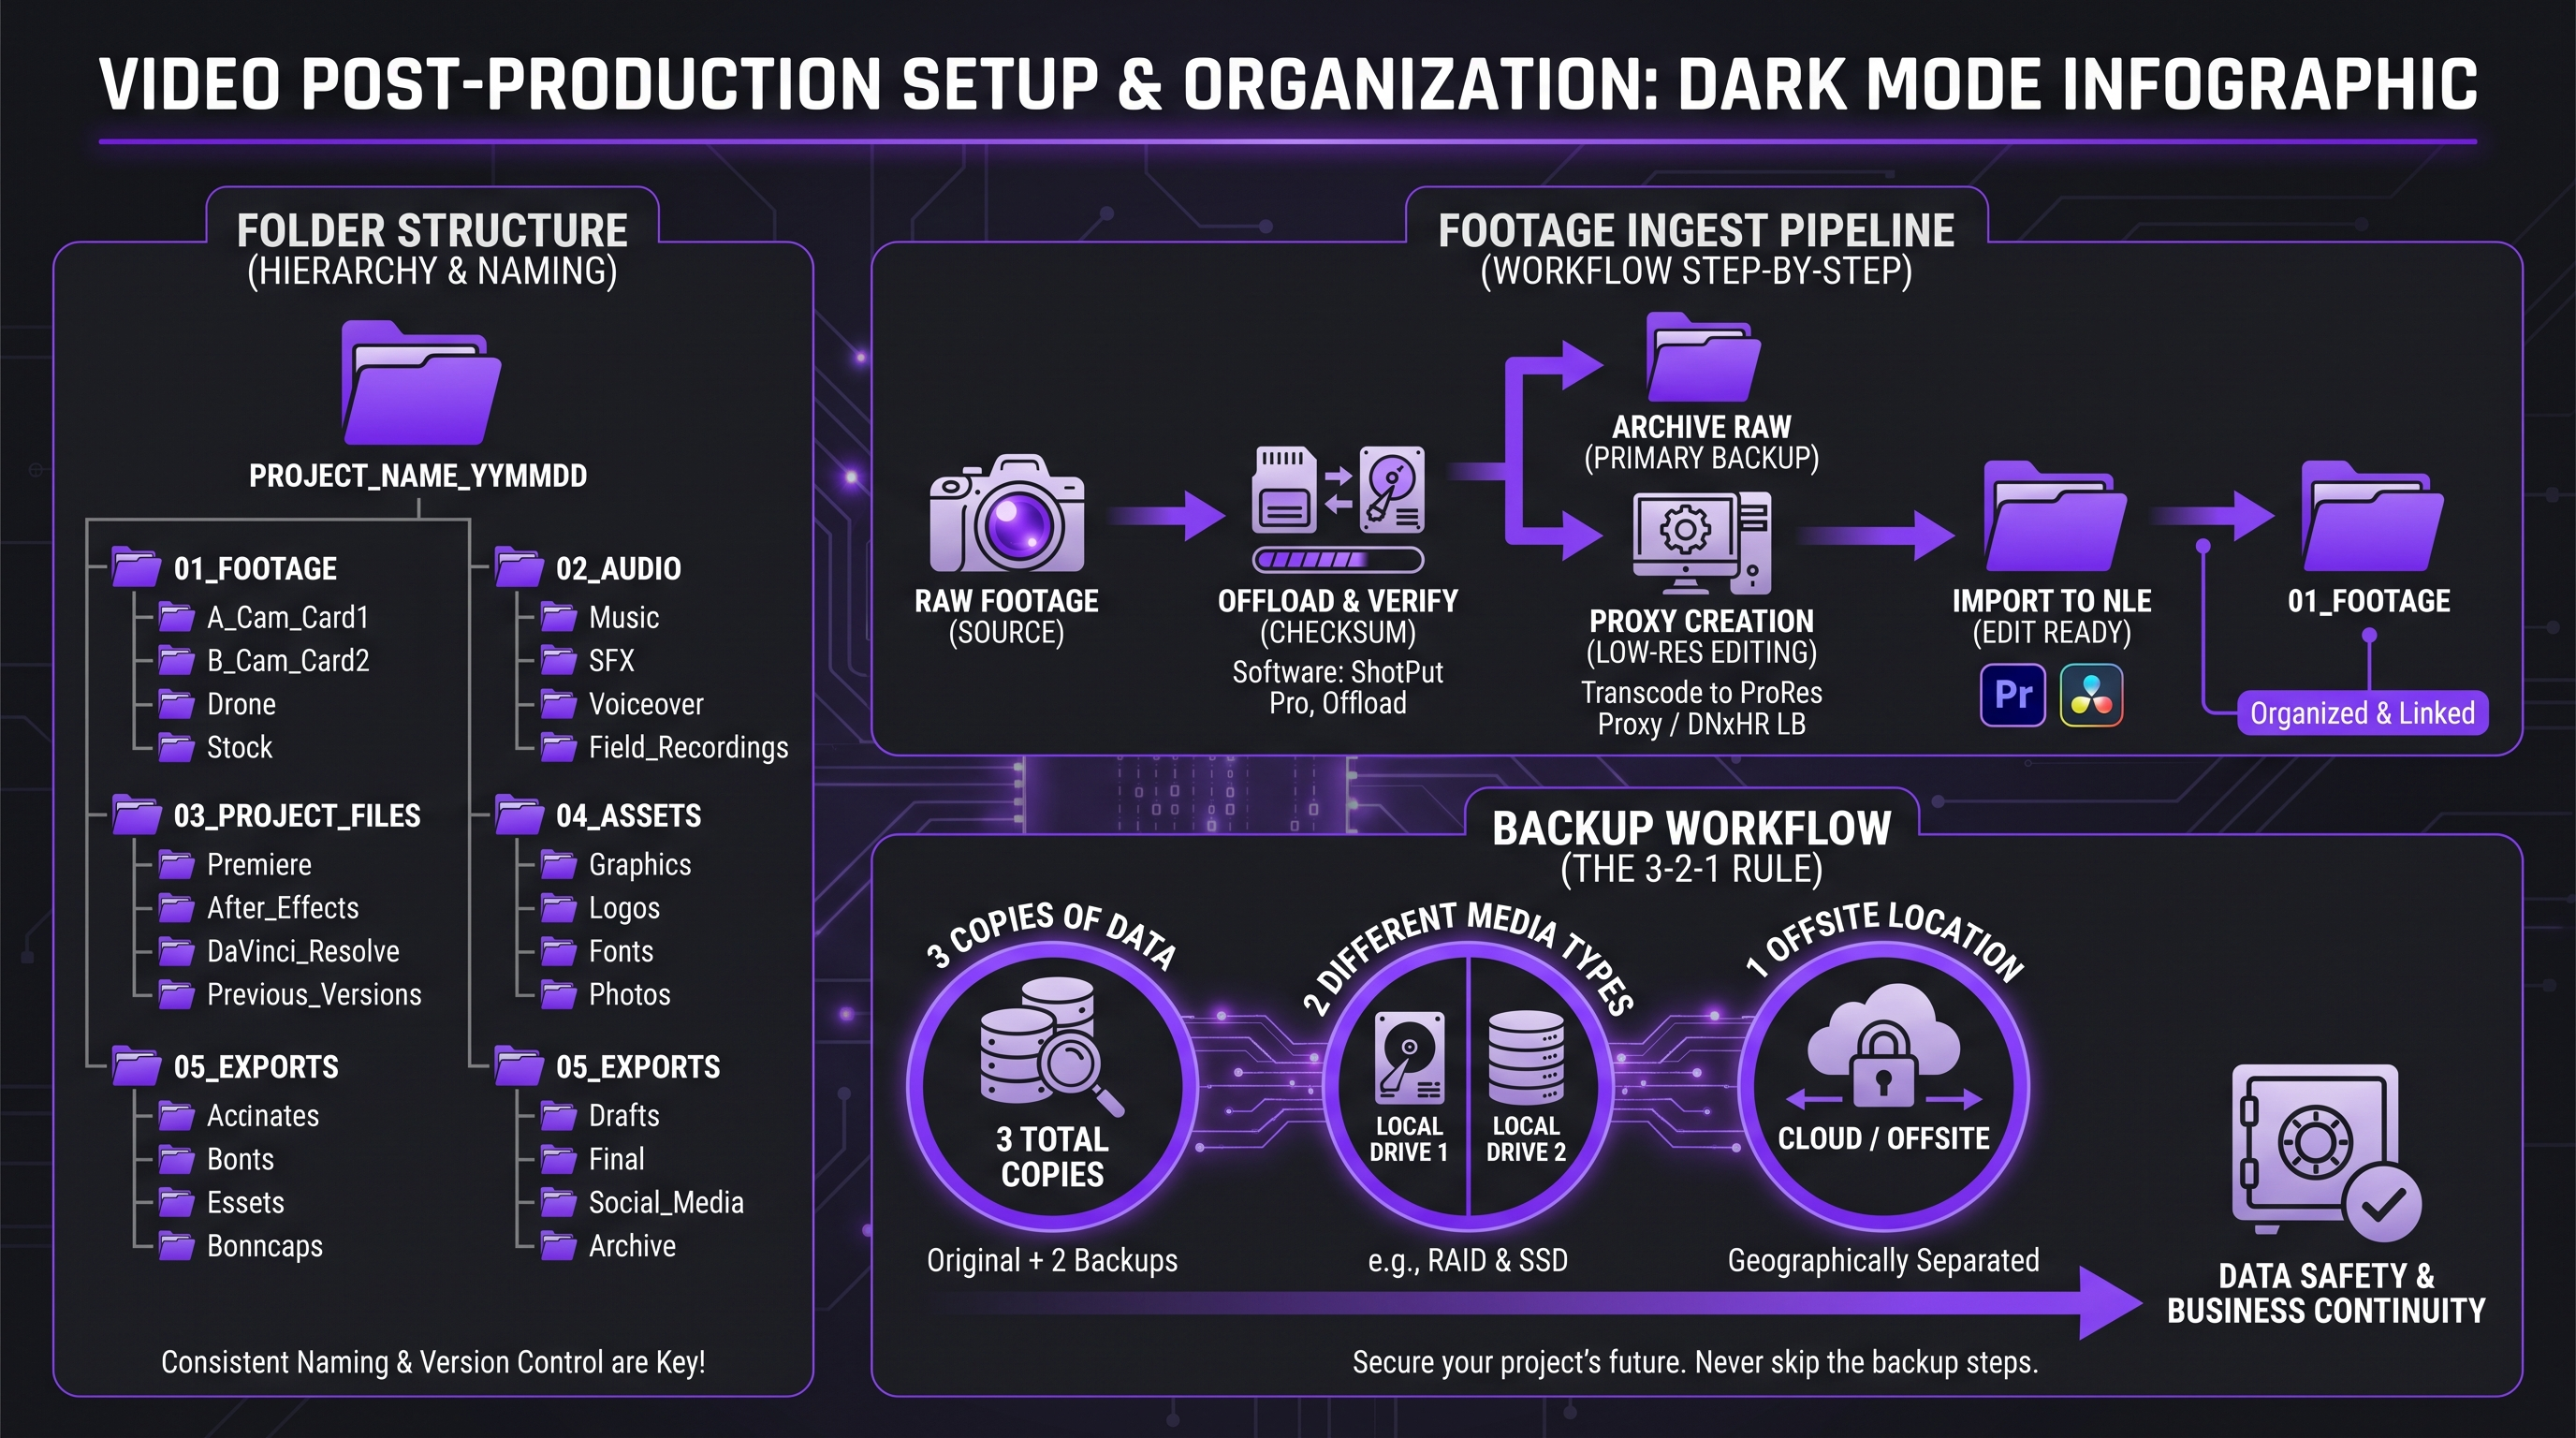
Copy every camera card, audio recorder, and B-roll drive to a primary working drive. Log the total clip count, camera designations (A-cam, B-cam), and any notes from the production team about performance or technical issues. Do not begin editing from the original cards — a single drop or accidental format ends the project.
Step 2 — Organize Your Project Folder Structure
A consistent folder structure is the foundation of a transferable project. At minimum, create top-level folders for: Raw Footage / Audio / Graphics / Music & SFX / Exports / Project Files. Inside Raw Footage, organize by camera or shoot day. An editor who picks up this project six months later — or at 2 AM on a deadline — should find any asset in under 30 seconds.
Step 3 — Back Up Raw Footage in Two Separate Locations
A backup sitting on the same desk as the working drive is not a backup — it is a copy. The industry standard practice follows a 3-2-1 approach: three copies, on two types of media, with one offsite or in the cloud. At minimum, back up to an external drive and a cloud storage service (such as Frame.io or similar team video platforms) before any editing begins. Once footage is lost, no checklist recovers it.
Step 4 — Review the Production Brief, Script, and Storyboard
Before the editor cuts a single clip, they should read the original script, review any storyboard or shot list, and understand the video’s purpose, audience, and required call to action. This review shapes every editorial decision that follows. Without it, editors solve technical problems they can see while missing strategic problems they cannot.
Step 5 — Align on Deliverable Specifications
Establish the required output formats before cutting begins: resolution (1080p, 4K), aspect ratios (16:9, 9:16, 1:1), frame rate, codec, target platforms, and maximum file size. If you are delivering for a specific platform, verify that platform’s current technical requirements — YouTube, LinkedIn, Meta, and broadcast each have distinct specs. Discovering a format mismatch at the end of post is an entirely avoidable problem.
Phase 2 — Rough Cut and Assembly (Steps 6–10)
The rough cut phase is where you build the story. It is intentionally imperfect — the goal is structure, not polish. Locking story before touching aesthetics saves substantial time and prevents the most common post-production trap: polishing the wrong version of the video.
Step 6 — Sync Multi-Camera or Dual-System Audio
If your production used a separate audio recorder or multiple cameras, sync them before beginning any editorial work. Use a clapper board slate or audio waveform syncing — most professional NLEs support automatic multicam sync. Misaligned audio that is discovered after the fine cut adds a full re-export cycle to the timeline.
Step 7 — Build the Assembly Cut from Selects
Go through all primary footage and mark your selects — the best takes and most useful B-roll. Build an assembly cut by laying selects in sequence without worrying about transitions, pacing, or timing. The assembly cut is typically 30–50% longer than the final target duration and is for the editor’s eyes only.
Step 8 — Trim to Rough Cut at Approximate Target Duration
Condense the assembly cut to within 20–30% of the target duration. At this stage, temp music can be added (clearly labeled as placeholder), and rough pacing decisions are made. The story structure — beginning, middle, end, or problem/solution/CTA — should be clear and intact.
Step 9 — Present the Rough Cut to Key Stakeholders
Share the rough cut with the core decision-makers — typically the marketing lead and one subject-matter expert. Establish a clear feedback brief: you are reviewing story and messaging only. Feedback on color, sound mix, or graphics at the rough cut stage creates rework in the wrong phase. Use a review platform where comments are timestamped to the exact frame.
Step 10 — Lock Story Structure Before Advancing
Do not proceed to Phase 3 until the story arc is approved. This is a real gate, not a polite suggestion. Structural changes after motion graphics are added or color has been graded ripple through every downstream element and multiply revision costs significantly. “Story lock” means: the sequence of scenes is final and no footage will be added or removed after this point.
Phase 3 — Picture Lock and Visual Polish (Steps 11–16)
Picture lock is the milestone where the editorial timeline is frozen. No cuts are added, removed, or repositioned. Every downstream element — audio mix, color grade, graphics — is built on this frozen timeline. Protecting picture lock is the post-production team’s most important discipline.
Step 11 — Incorporate Rough Cut Feedback and Build the Fine Cut
Address all approved story-level feedback from the rough cut review. Tighten pacing, sharpen transitions, and ensure every scene earns its runtime. The fine cut should be within 5% of the final target duration. This is the version stakeholders will see before picture lock is declared.
Step 12 — Add Temp Graphics and Text Overlays for Context
Place rough placeholder text for lower thirds, title cards, statistics, and call-to-action overlays. These are clearly labeled “TEMP” and exist only to communicate intent to stakeholders during the fine cut review. Motion graphics designers need to see the approved cut before building final assets.
Step 13 — Review Pacing Against the Video’s Specific Format
Pacing requirements differ significantly by format. A 60-second paid social ad has fundamentally different rhythm than a 10-minute thought-leadership interview or a 90-second SaaS demo. Evaluate the cut against the specific platform and audience context it was made for — not against general instinct. Identify any sections where audience attention is likely to drop and address them before moving forward.
Step 14 — Apply Visual Effects and Motion Graphics
With the cut approved and picture-locked, motion graphics and VFX can be applied to the final timeline. This includes animated lower thirds, kinetic text, logo animations, transitions, and any screen recordings or UI demos. Build all elements to the confirmed deliverable specifications established in Step 5.
Step 15 — Build Title Cards, Lower Thirds, and End Screens
Every text element on screen should follow the brand style guide: typeface, size, color, and animation timing. Verify that all speaker names, job titles, and organization names are spelled correctly against the original brief — incorrect lower thirds are one of the most common errors flagged by clients at final review. End screens should include clear CTAs consistent with the video’s objective.
Step 16 — Achieve Picture Lock with a Formal Sign-Off
Picture lock requires an explicit written or recorded approval from the project lead. This is not implied by a lack of objections — it is a direct confirmation that the cut, all graphics, and all text elements are final. Once picture lock is declared, structural changes are out of scope. Document this milestone with a timestamp in your project management system.
Phase 4 — Audio, Music, and Sound Mix (Steps 17–20)
Audio is where most corporate videos quietly fail. Viewers can forgive average visuals, but they will abandon a video with muddy dialogue, distracting background noise, or music that overwhelms the voice track. These four steps ensure your audio stands up on its own before the final export.
Step 17 — Clean Up On-Set Audio and Apply Noise Reduction
Run every dialogue track through noise reduction and de-reverb processing. Remove HVAC hum, traffic noise, and room tone inconsistency. If on-set audio is unusable for certain sections, consider ADR (Automated Dialogue Replacement) or, for factual narration, a re-recorded voiceover from the original speaker. Do not leave problem audio for the final mix — it compounds at every downstream step.
Step 18 — Select and License Background Music
Replace all temp music with properly licensed tracks before final delivery. Music licensing is non-negotiable: distributing a video with unlicensed music exposes your organization to copyright claims, platform takedowns, and in some jurisdictions, legal liability. Services like Epidemic Sound and similar royalty-free platforms provide commercial licenses that cover most distribution scenarios. Retain license documentation for every track used.
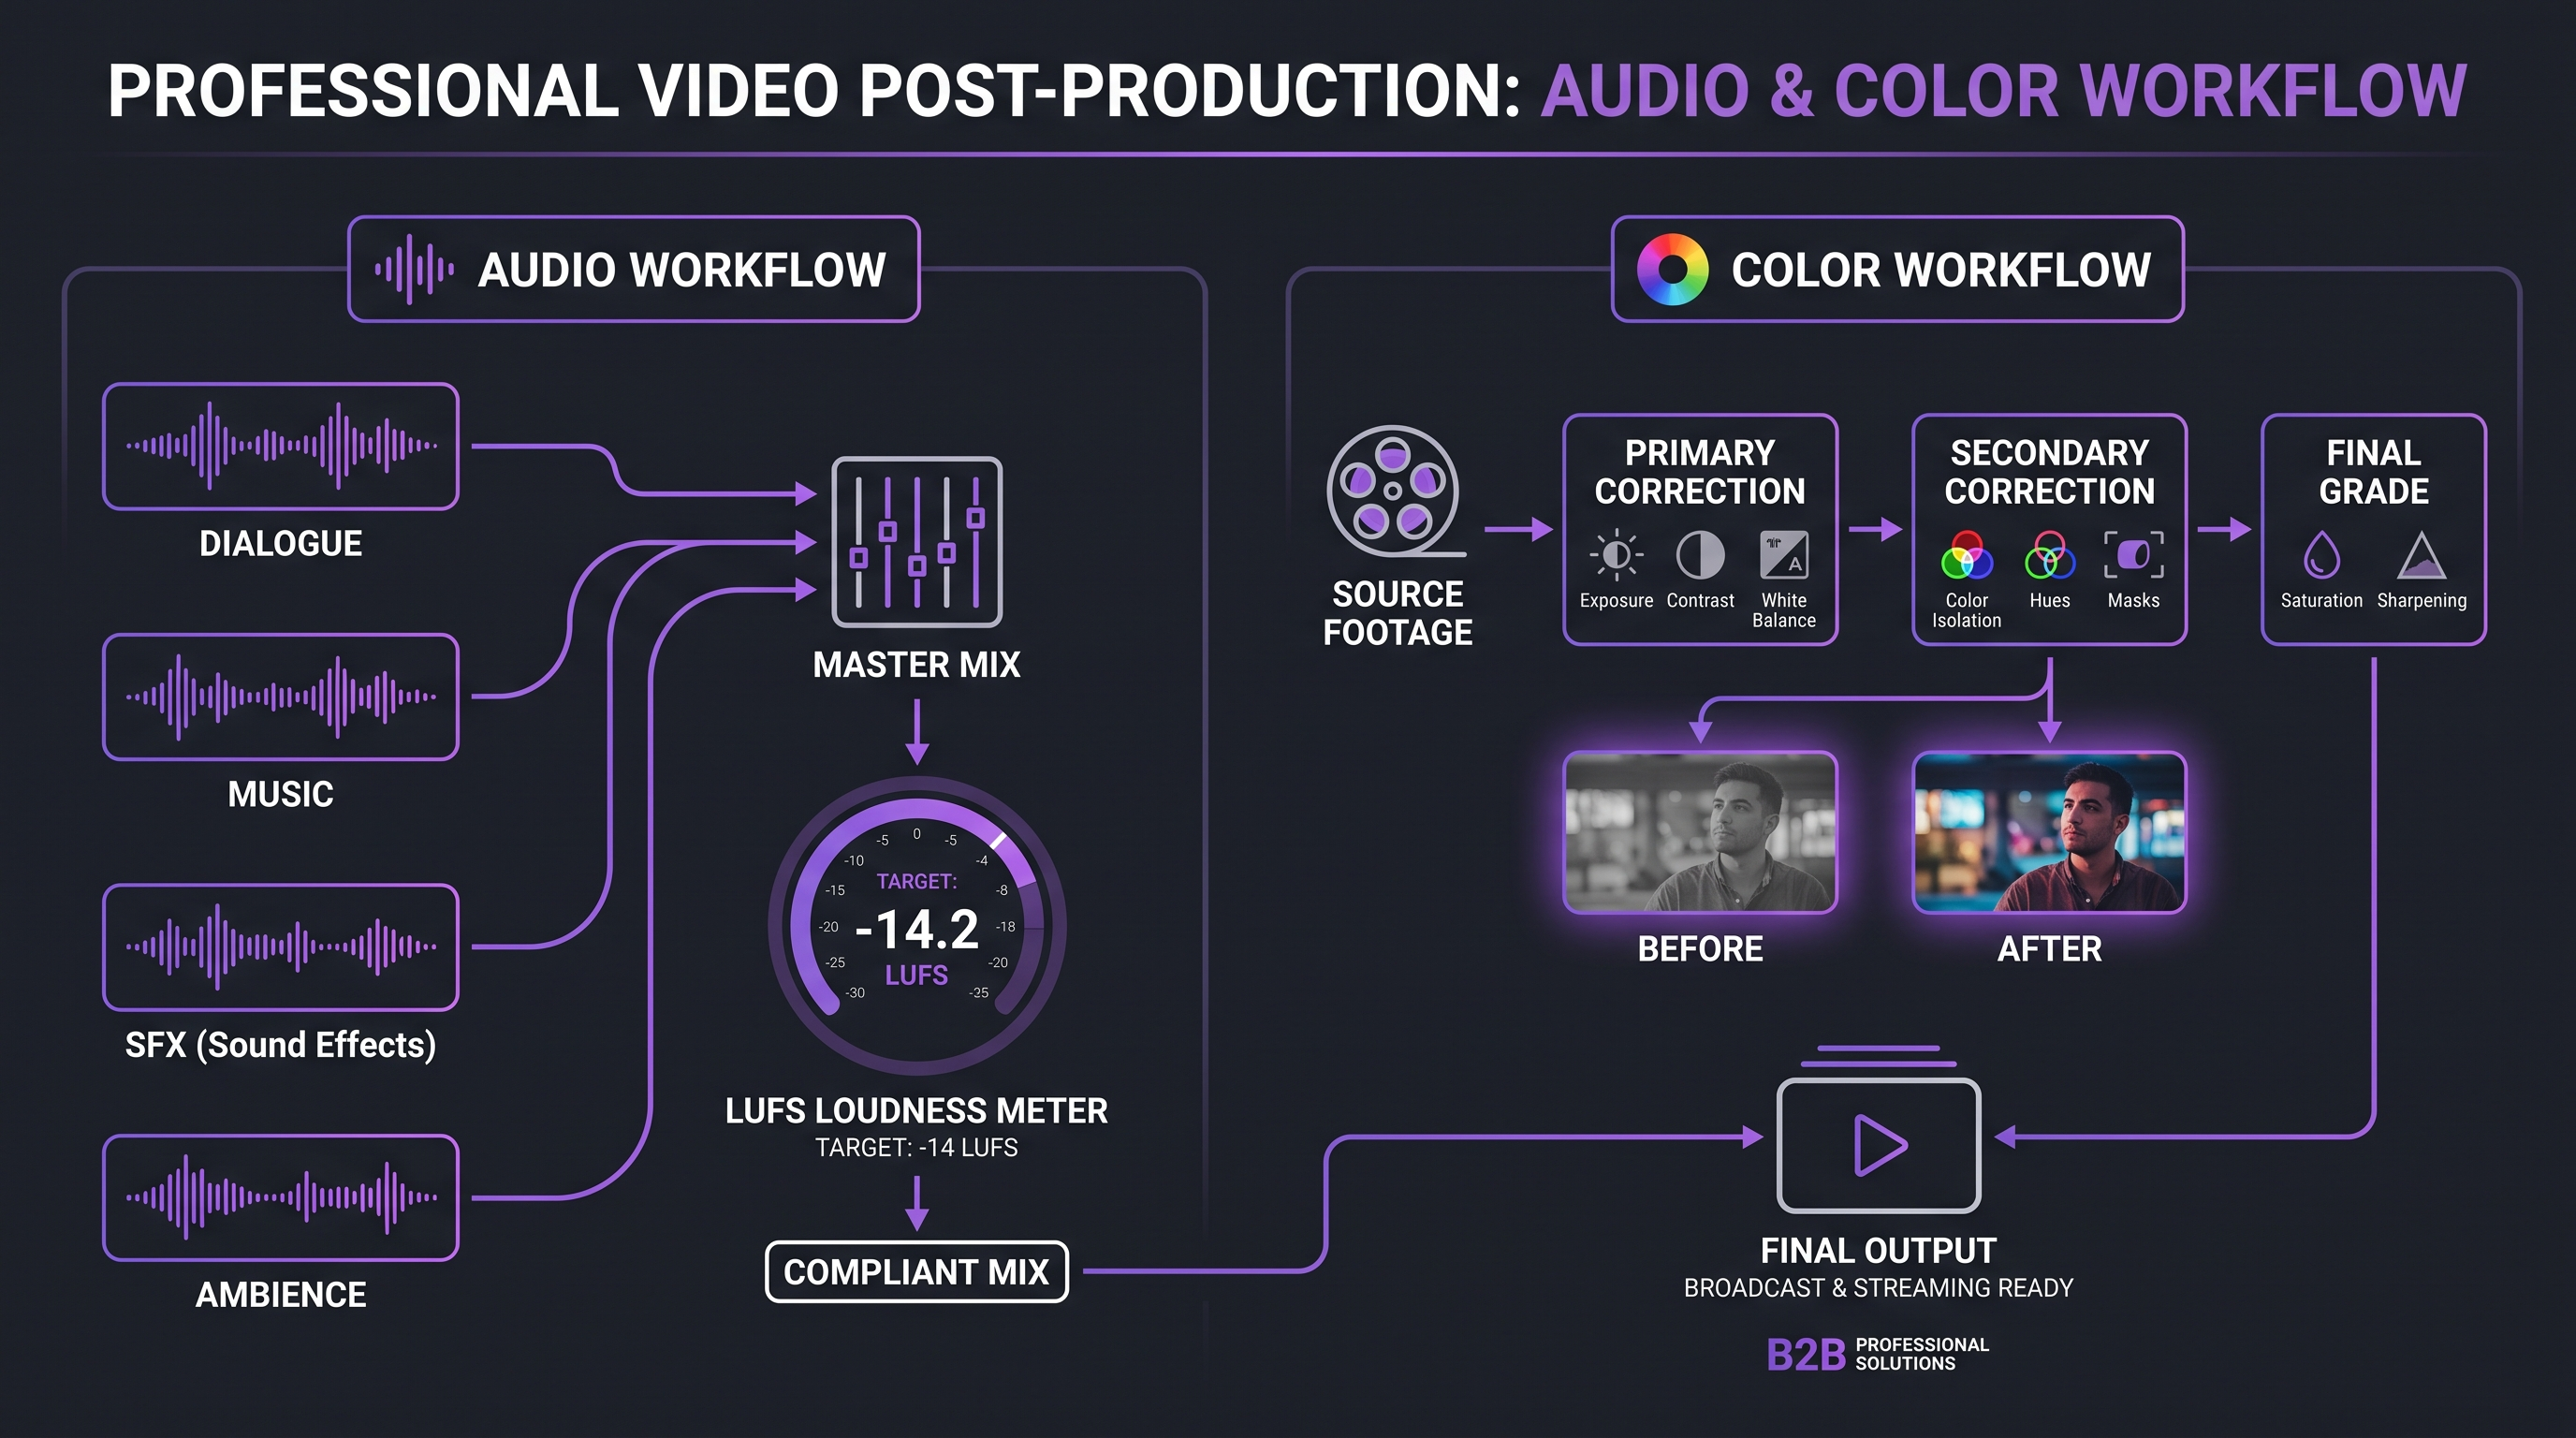
Step 19 — Build the Full Audio Mix: Dialogue, Music, SFX, Ambience
Layer all audio elements into a final mix: dialogue at the front of the mix, music supporting rather than competing, sound effects adding dimension without distraction, and ambient room tone filling unnatural silences. Balance is the goal — every element should serve the listener’s comprehension of the content, not impress them with production complexity.
Step 20 — Check Audio Levels Against Platform Loudness Standards
Different platforms have different loudness normalization targets. YouTube normalizes to approximately -14 LUFS integrated; broadcast standards typically target -23 LUFS or -24 LUFS depending on the territory and standard followed (EBU R 128 or ATSC A/85). Delivering audio that is too loud results in automatic attenuation that compresses your mix; too quiet and your video sounds flat. Measure with a loudness meter before final export. The SMPTE and EBU publish current loudness standards for reference.
Phase 5 — Color Grading and Graphics (Steps 21–23)
Color grading is the visual equivalent of the audio mix — it unifies footage shot across different conditions, establishes the emotional tone, and brings the brand’s visual identity into the final frame. It belongs after picture lock and before final QC.
Step 21 — Apply Primary Color Correction to All Clips
Primary color correction neutralizes exposure and white balance inconsistencies across clips. Every shot in the sequence should read as if it was filmed under the same lighting conditions. This is technical work, not creative work — the goal is perceptual consistency, not a distinct visual look. Use scopes (waveform, vectorscope, parade) rather than monitors alone, as display calibration varies.
Step 22 — Apply Secondary Color Grading for Look and Feel
Secondary grading is creative: applying a LUT or custom grade that gives the video its intended emotional register. Brand guidelines sometimes specify a color grade direction (warm and approachable, cool and authoritative, cinematic and high-contrast). If no brand specification exists, the grade should serve the content’s purpose — a training video and a brand film warrant different treatments. Ensure the grade is consistent across all cuts of the video, including any derivative social formats.
Step 23 — Finalize All Motion Graphics and Animated Elements
With color locked, composite all final motion graphic elements into the timeline. Verify that animated elements are rendering correctly at the final export resolution — a title that looks clean at 1080p can reveal anti-aliasing issues at 4K and vice versa. Check all text for typos, verify that every URL on screen is active and correct, and confirm that the brand logo appears at its correct approved size and placement.
Phase 6 — Final Review and Delivery (Steps 24–25)
The final two steps are the quality gate and the handoff. Both have a binary outcome: passed or failed. Treating them as a formality is the most reliable path to a re-export cycle at the least convenient time.
Step 24 — Conduct a Full QC Pass Across All Technical Specifications
A full QC pass reviews the completed export — not the timeline — against the deliverable specification established in Step 5. Check: correct resolution and frame rate, clean audio without clicks or drops, no visual artifacts (dropped frames, color banding, compression noise), all text legible at final delivery size, correct duration, and file size within platform limits. For broadcast or streaming deliveries, requirements from platforms such as Netflix’s technical specifications define pass/fail criteria with zero tolerance for certain error types. For web and social, YouTube’s upload encoding recommendations and equivalent platform guides are the reference standard.
Step 25 — Export in Platform-Specific Formats and Deliver Final Assets
Export each format required by the delivery specification: a master archive file (ProRes, DNxHR, or highest-quality H.264/H.265 depending on archive standards), and platform-specific compressed deliverables for each distribution channel. Deliver the complete asset package — video files, subtitle files, thumbnail images, and any associated audio masters — via a labeled, organized delivery folder. Retain the original project file and all source assets according to your organization’s retention policy. Archive is not optional; change requests arrive months after delivery more often than is convenient.
Post-Production Checklist by Video Type
Not every video type requires the same level of depth across each phase. The table below maps the 25 steps to common corporate video formats and indicates which phases typically require the most attention for each type.
💡 Pro Tip: If you are producing multiple formats from one shoot — say, a 3-minute brand video, a 60-second cut-down, and three 15-second social versions — plan the checklist as one master pass that branches at Phase 5. Share one picture lock review but build format-specific exports from a single project file. It multiplies output without multiplying process time.
DIY vs. Agency Post-Production: What the Checklist Reveals
The 25-step checklist is agnostic about who does the work. But working through it honestly often reveals whether an in-house team has the bandwidth, skills, and tooling to execute each phase at the required quality level — or whether a specialist partner would consistently deliver better results at comparable or lower cost. Working with an experienced video editing agency means each of these 25 steps is covered by dedicated specialists who run the same process daily across dozens of concurrent projects.
The table below maps common friction points by phase and compares the typical in-house and agency experience. It is not a case that one is always right — it is a framework for making that decision with clear criteria rather than cost alone. You can explore the full analysis in this comparison of agency vs. freelancer video editing and the related breakdown of professional video editing costs.
For teams producing more than eight to ten videos per quarter, the organizational overhead of running this checklist internally — managing editors, handling revision cycles, maintaining tool licenses, and owning QC — commonly exceeds the cost of a dedicated agency relationship. The inflection point depends on the required production quality and the internal team’s actual capacity. Teams that outsource post-production to Increditors often find that the 25 steps happen in parallel by specialists who run them on a daily basis, which removes the project management burden from the marketing team entirely.
Frequently Asked Questions
How long does post-production take for a typical corporate video?
Timelines vary significantly by video length, complexity, and revision volume. A 2–3 minute interview-driven piece commonly requires five to ten business days from raw footage delivery to final export when following a structured checklist process. Paid social ad packages with multiple format variants typically require a similar or slightly shorter timeline if produced concurrently from a single shoot day. Adding additional rounds of stakeholder review, complex motion graphics, or broadcast-grade audio work extends these timelines proportionally.
What is picture lock and why does it matter?
Picture lock is the formal milestone at which the video’s editorial structure is declared final — no clips will be added, removed, or repositioned after this point. It matters because every downstream element in the post-production process (audio mix, color grade, motion graphics) is built on the locked timeline. Reopening the cut after audio or graphics work has begun requires those elements to be rebuilt, which multiplies revision time and cost significantly.
Can this checklist be used for social-first video content?
Yes, though some steps are abbreviated for short-form formats. For a 15–30 second social video, organization and backup steps (1–3) remain non-negotiable, picture lock is often achieved within a single review cycle, and audio cleanup (Step 17) and loudness normalization (Step 20) are critical because social platforms apply automatic loudness adjustment. The full checklist scales — a 15-second ad runs through it faster, not by skipping steps, but because each step requires less time.
What software does this checklist assume?
The checklist is software-agnostic. The phases and steps described apply to any professional non-linear editing environment — Adobe Premiere Pro, DaVinci Resolve, Final Cut Pro, or Avid Media Composer. Specific tool recommendations within each step (noise reduction, loudness meters, color scopes) are available as native features or standard plugins in all of these platforms. The principles are universal; the tool implementations differ only at the interface level.
How do I manage stakeholder feedback without derailing the checklist process?
Define the scope of each review gate clearly before sharing the video. The rough cut review is for story and messaging only. The fine cut review is for editorial refinement only. The motion graphics review is for text accuracy and visual elements only. Presenting each review with a written brief that states “we are reviewing X — out-of-scope feedback will be logged for a future revision” trains stakeholders to give focused feedback faster, and protects the timeline from scope creep. A timestamped video review platform reinforces this structure by attaching comments to specific frames.
Verdict
Post-production is the phase that separates footage from video. Running it without a structured checklist introduces avoidable rework, misaligned stakeholder expectations, and inconsistent quality — all of which compound when your video volume grows.
These 25 steps cover every domain of post-production in a logical, phase-gated sequence. Use them as a shared document with your editing team, adapt the format to your project management tooling, and enforce the gate conditions — particularly picture lock and audio sign-off — as real milestones rather than soft checkpoints. The investment in process pays back on the first project where it prevents a structural revision after graphics have been built.
For teams whose video volume has outpaced their internal post-production capacity, the checklist also provides a clear brief for evaluating or onboarding an agency partner — any professional team should be able to map their own process to these 25 steps and tell you exactly how they handle each one.
Ready for Video That Actually Converts?
Tell us about your project and we will put together a custom plan.